You are browsing the archive for Cracked It | cerebral palsy.

Horse mounting ramp

February 9, 2018 in Solution

Via Airplanes and Rockets

Horse mounting ramp

This design looks perfect forĀ riders with reduced mobility who need a walking frame or wheelchair. Simply roll on up to the platform where you’re at the perfect height to mount the horse.

Let us know if you give this one a try!

Download theĀ Horse mounting ramp blueprints

Horse mounting ramp blueprints

Read more atĀ Airplanes and Rockets

3D printed bottle openers – Put to the test

November 13, 2017 in Solution

Bottle openers can give an extra helping hand for people with reduced grip strength, arthritis or other conditions affecting the fingers and hands. Get a grip on that lid and take a swig in style with your very own 3D printed bottle opener – but which should you choose?!

Digital design and manufacturing means we are no longer beholden to the restrictions of mass manufacturing. But with so many designs to choose from online – how can you tell which will work for you?! We’ve put 15 designs to the test to give you an idea…

Bottle openers featured in our test:

  1. Water bottle opener by Perry Cain
  2. Bottle opener by HeinPragt (Winning Design)
  3. Bottle Opener by Matthew Young 237
  4. Water bottle opener by zachnikatel
  5. Bottle opener 3d model by just4fun
  6. Bottle Opener by pelmen
  7. Soda Bottle Opener By Mdekato
  8. Easier Bottle Opener by Mart456
  9. Bottle Opener by McMikel (Winning Design)
  10. Soda Pop Bottle Opener by Kayee
  11. Screw cap bottle opener by FilipPeeters (Winning Design)
  12. Water bottle opener by i3DGear
  13. Bottle Opener by ab3D-Brazil
  14. Bottle Opener by STEVEWBART (Winning Design)
  15. Tri-Bar Water Bottle Cap Wrench by chetjohnston


Remember to click the ‘This Solution Helped Me’ button at the top of the page if you give this a try!

by Jemma

Laptop Keyguard

October 31, 2017 in Solution

Designed for portability, this keyguard fits on aĀ Lenovo Ideapad 310 but could be adapted to fit most laptops. Sticky back velcro can be used to attach the guard to your laptop.

Keyboard guard

Cracked-it Laptop Keyguard

Download the laptop keyguard CNC file.

Remember to click the ‘This Solution Helped Me’ button at the top of the page if you give this a try!

Wooden Boccia ramp

June 30, 2017 in Solution

This postĀ is meant to show the steps taken to build a ramp for the adapted sport ā€˜bocciaā€™. It is specifically designed to be played by people with cerebral palsy. A ramp is used to throw a ball to any direction the player aims to.

Via Physical Activity Materials & Disability

The materials used:

  • Three wooden planks
  • Tape measure
  • Pencil
  • White glue
  • Clamps
  • Carpenterā€™s brace
  • Bolts
  • Electric screwdriver
  • Fretsaw
  • As support:
  • Two wooden planks
  • White glue
  • Bolts
  • Hinges


NEXT STEPS:

  • Step 1, construction: In this step, we begin with the construction process of the ramp, in which two wooden planks are bonded using white glue and then screwed using an electric screwdriver.

CAM01289-1-1

CAM01290-1


  • Step 2, assembly: In this step, we carry out the construction of the support so that it can be ready by the moment all materials are to be put together

IMG-20141221-WA0025


IMG-20141221-WA0027Step 3, painting: Once all parts are already built, we proceed with the painting of the ramp.

IMG-20141221-WA0029


IMG-20141221-WA0032


Finally, having taken every aforementioned step, the last step is putting the pieces together and get our material ready.

IMG-20141221-WA0018

IMG-20141221-WA0034

ViaĀ Physical Activity Materials & Disability

Remember to click the ‘This Solution Helped Me’ button at the top of this page if you give this a try!


Zocus assistive camera lens adjuster

June 21, 2017 in Solution

Zocus camera

Originally posted here

Download the digital files for 3D printing

For assembly instructions follow the tutorial on Instructables

Remember to click the “This Solution Helped Me” button at the top of this page if you give this a try!

FleXiseat floor seat

January 27, 2017 in Solution

F41EGNZHVXPR9YQ.MEDIUM

This DIY product is designed for a three years old boy that was born with cerebral palsy. He has an inadequate trunk control so he can not sit independently, he would fall on his side.

At home he sits in a custom tailor made seatshell. But this is too big to take everywhere along. His parents like to go out by bike to friends or family, but there is always the problem that they can’t let hem sit on a normal chair to play with other children.

The question of the parents was to make a chair which is foldable, easy to carry, giving enough support so that the boy can sit straight and play with his friends, but still compact to put in the bicycle bag.

A shot movie, following on the intractable, will explain the advantages of the seat.

Step 1: Materials needed

Materials needed

Step 2: Saw the wooden pieces

Saw the wooden pieces
IMG_4978.jpeg
538cc736d535cf13ee000043.jpg
538cc7dad535cff93f00008f.jpg

Buy two different pieces of wood, a 3mm multiplex and a 15mm multiplex. Than saw two 395x300x4mm pieces and two 330x400x15mm pieces.
Drill holes in the 15 mm pieces; drill in a line 35mm of the border. The distance between two holes is 3 mm.Buy two different pieces of wood, a 3mm multiplex and a 15mm multiplex. Than saw two 395x300x4mm pieces and two 330x400x15mm pieces.

Drill holes in the 15 mm pieces; drill in a line 35mm of the border. The distance between two holes is 3 mm.

There have to be cut out rectangulars as well, this can also be done with a drill, by drilling holes close to each other.

Step 3: Attach a lath

Attach a lath

First there has to be sawed a lath 330x20X15, we attached this to one of the wooden pieces of 15 thickness, with an air staple gun but this can also be done manually.

Step 4: Connecting the wooden pieces

Connecting the wooden pieces

Weave the rope between the thickest wooden pieces by using the saddle stitch. This technique will ensure the proper firmness.

Step 5: Attach Foam

Attach Foam
L1060690.JPG

Attach the foam using an air staple gun or an manual stapler.

Step 6: Skai

Skai
L1060696.JPG

Attach the leather, by using an air staple gun or manually with a stapler.

Step 7: Handles

Handles

Stich handles and attach them onto the back of the wooden pieces.

Step 8: The back

The back
L1060744.JPG

Attach the thinner wooden pieces with some nails onto the backs of the seat, to hide the ugly staples.

Step 9: Add the straps

Add the straps
233293030.jpeg
538f15ef9d29c9a8fa00000d.jpg
L1060727.JPG

First make a finishing stitch around the openings for the buckles.

We used a support pants, because the child can not sit straight by himself. That little pants ensures support around the waist and helps him to sit up straight.

To attach the support pants, insert the buckles in the openings and secure them at the back with the clamping buckles.

Step 10: Make a fitting table

Make a fitting table
L1060733.JPG
L1060734.JPG

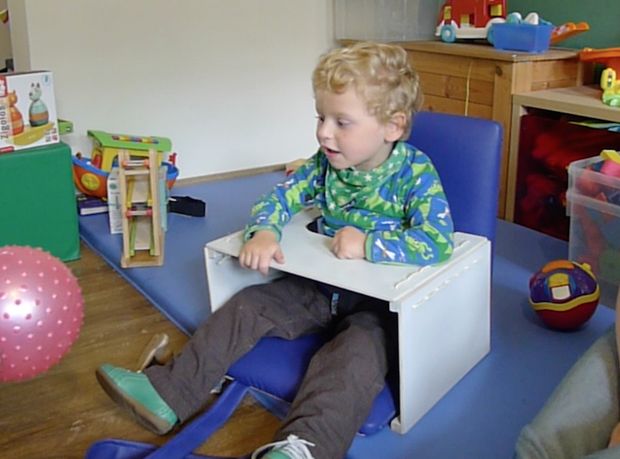
The table ensures extra stability for the child. The child can put his arms on the table and lean on it, this will make him sit up more straight by himself. He has to do some effort by himself with is better than a belt around his chest, because exercise is good for the child, otherwise he will get lazy which is bad for his muscles.

The table is made in the same style as the seat.

We used the multiplex. Dimensions:

– table leaf: 390x310x5mm
cutout for the belly: 260x150mm

– table legs: 310x210x5mm

To make the cutout for the belly, measure the waist of the child and see for yourself what the best measurement is for your child.

To put the table together, we used the same technique as the seat so we drill holes in the planks 20 mm of the borders. The holes are drilled 30mm from each other. For the plank, also drilling 20mm from the border and 30mm from each other.

For stability, we attached 4 laths again on the side planks, on each side plank, two laths. This laths are 18x15x310mm.

The planks are fixed to each other with rope again, we will do this in the same way as we did with the seat.

The loop that can be seen on the pictures has been stitched out of the skai and attached with staples onto the middle plank. This loop can be attached onto the support pants. This ensures that the table can’t be pushed away by the child while he is playing. This gives extra safety.

Step 11: Final result and team

Final result and team

You can find more information on our blog

Project made by:Carolle Geldof, Emily Quartier, Jaana Caes and Sahin Vanneste

Via Instructables

Be sure to click the ‘This Solution Helped Me’ button at the top of this page if you give this a try!

Hack your nail clippers with Sugru

January 20, 2017 in Solution

Fixperts Benchmark Residency – Nail Clippers grip Sugru hack from Fixperts on Vimeo.

With thanks to@MayaAlvarado1

Be sure to click the ‘This Solution Helped Me’ button if you give this a try!

3D printed Nail varnish helper

December 9, 2016 in Solution

Nail_varnish_holder_cracked-it


This 3D printed aid could be the perfect solution for someone with limited grip or dexterity, limb difference or anyone that finds it difficult to paint their nails! For help with 3D printing, get in touch with our sponsors DEMAND Design & Manufacture for Disability.

Download the 3D printable fileĀ 

Remember to click the ‘This Solution Helped Me button at the top of this page if this solution helped you.

Accessible gift wrapping hack

November 17, 2016 in Solution


This hack is the perfect way to make sure young kids and anyone that finds unwrapping too fiddly can still enjoy opening their gift!

You will need:

  • a gift!
  • wrapping paper
  • scissors
  • tape
  • ribbon
  • something to hold on to if the ribbon will be too small to grip – a gift tag or a keyring will work

Did this hack work for you? Remember to click the ‘This solution helped me” button at the top of this page, and then share a video of the fun part – unwrapping!

Homemade writing slope

November 4, 2016 in Solution

1298957

Make your own using 3 easy items.

  • Use a strong A4 binder (this one is a 3D ring 50mm binder)
  • A clipboard
  • A non-slip mat (you can buy this by the roll, however I found my small non-slip mat used for turning jars worked perfectly).

Simply assemble and you are ready to use it!

This is definitely an economical way to make a slope board and is perfect for those wanting to try out a slope board before paying for a longer term item. This homemade version cost me less than $15.

Via Your Kids OT

8415729

Remember to click the ‘This Solution Helped Me’ button at the top of the page, and post a picture of your writing slope in the comments!

Skip to toolbar