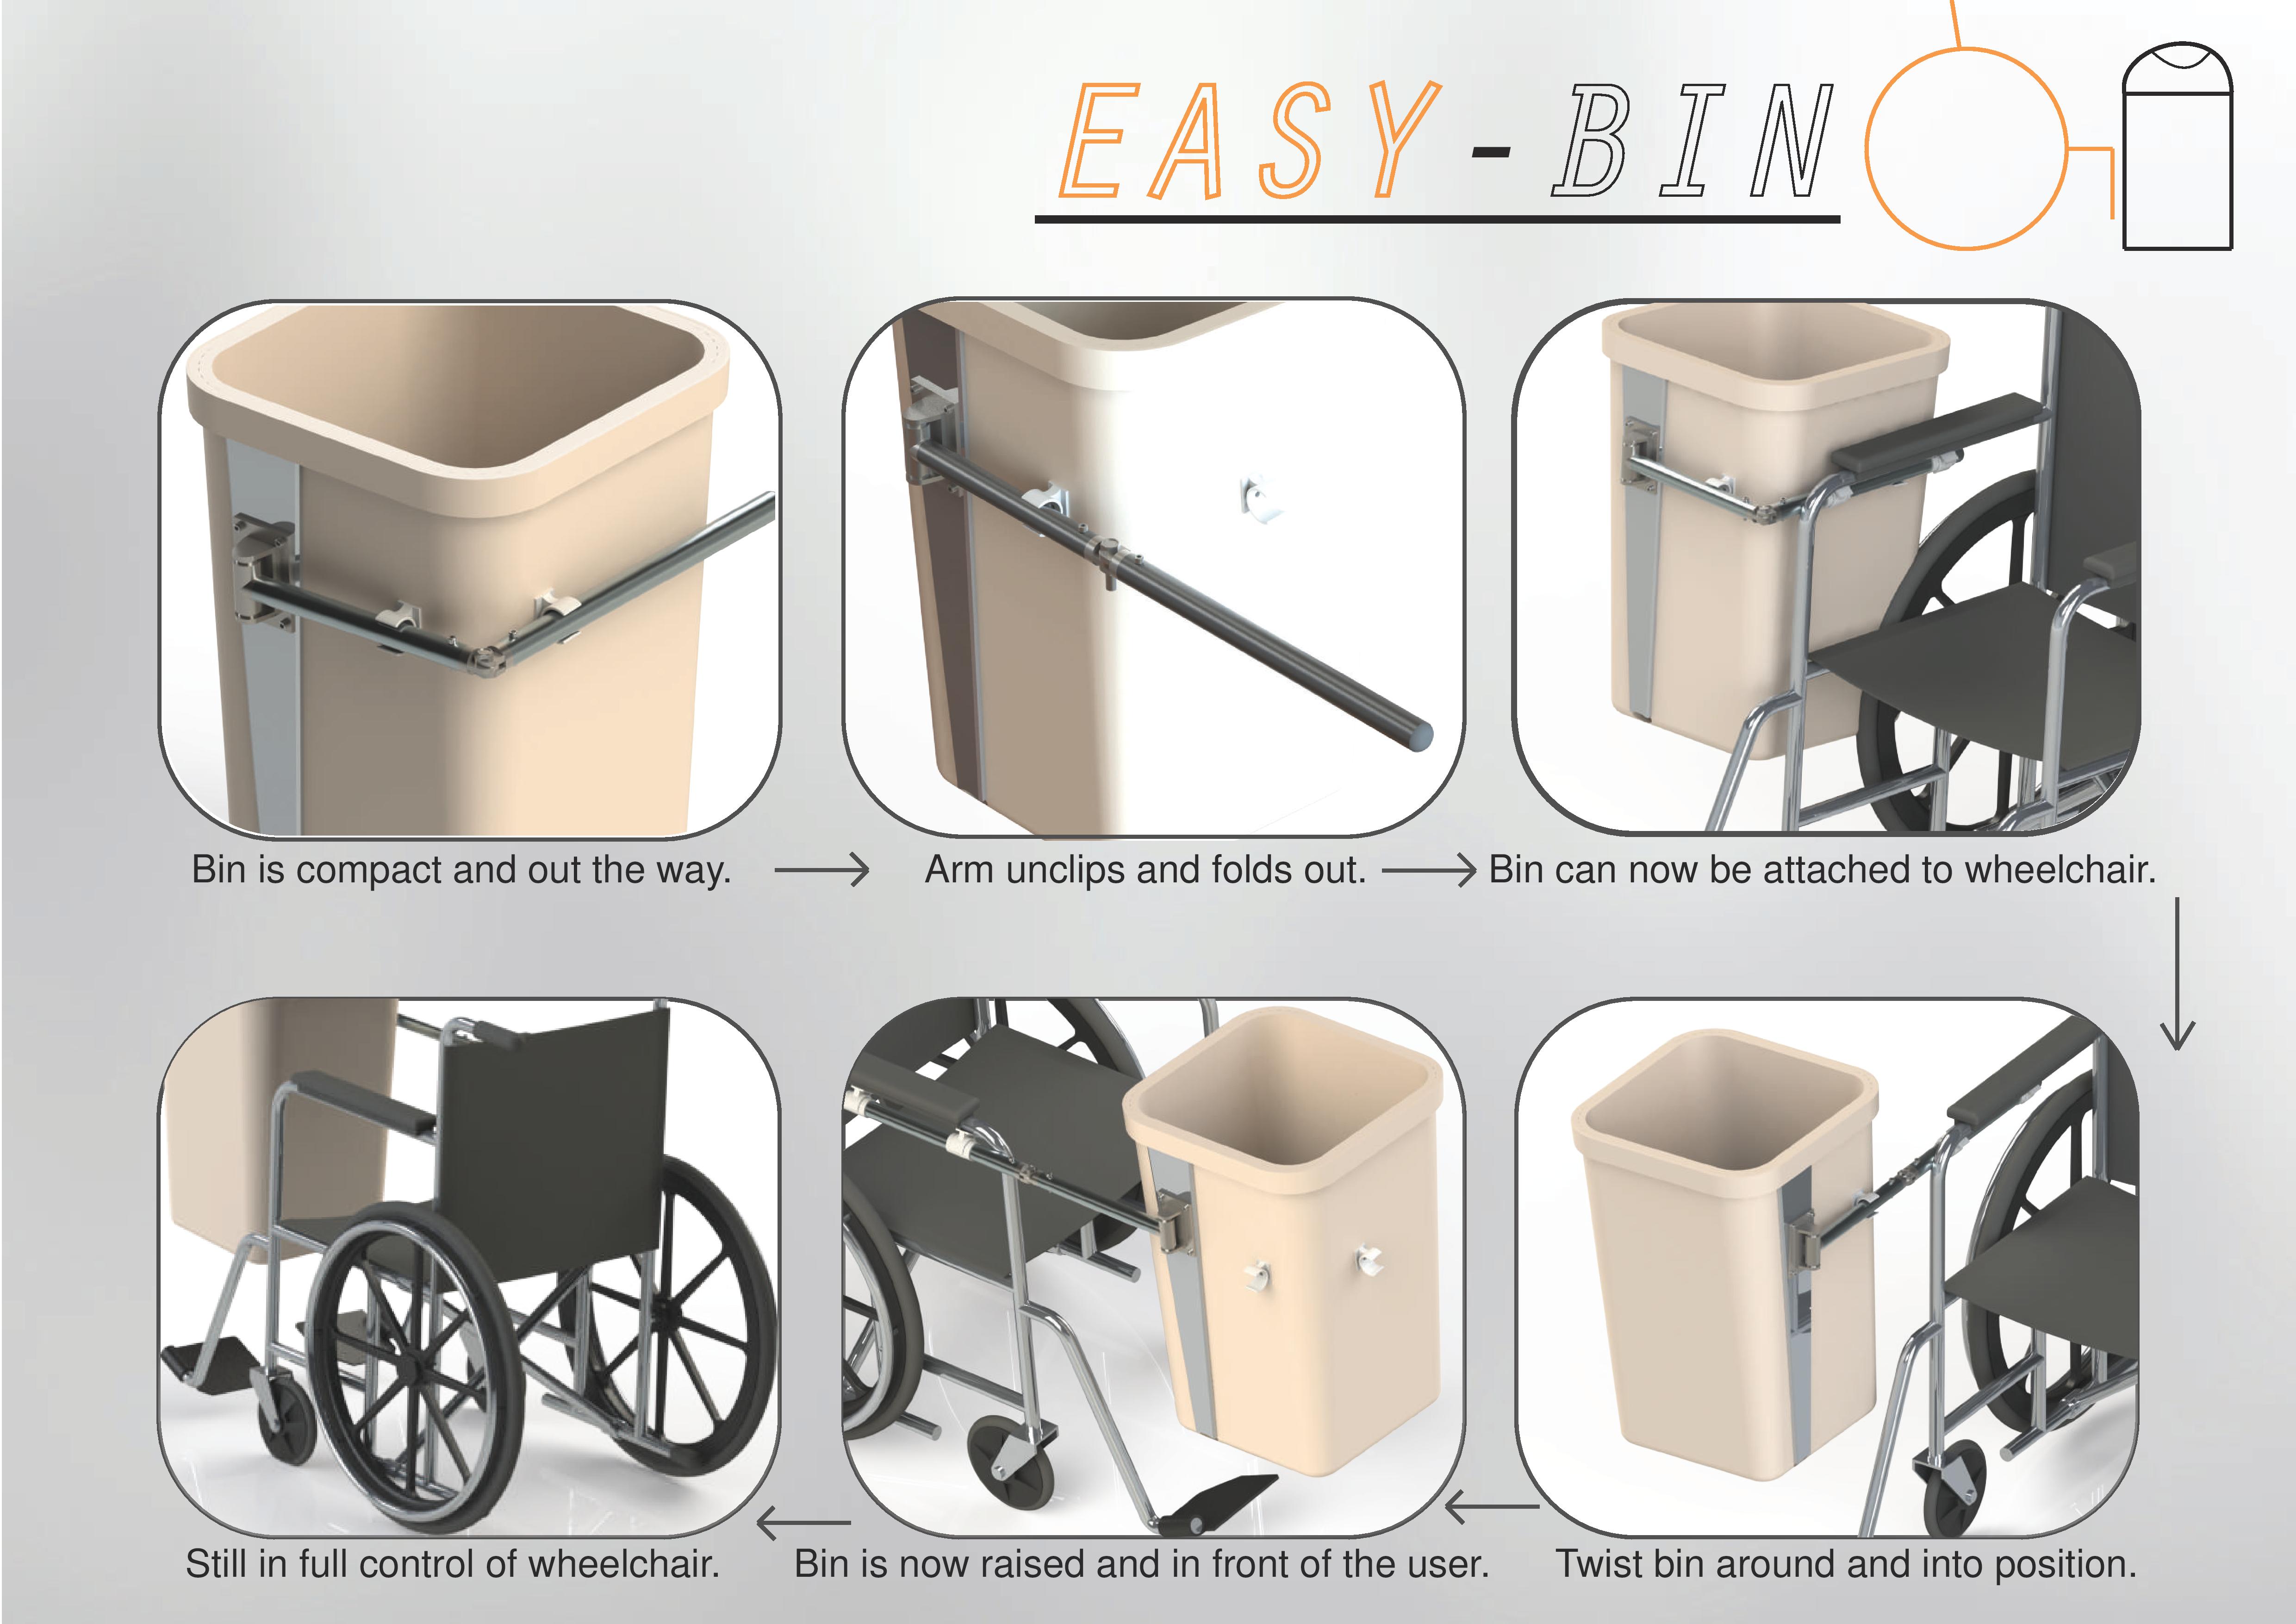
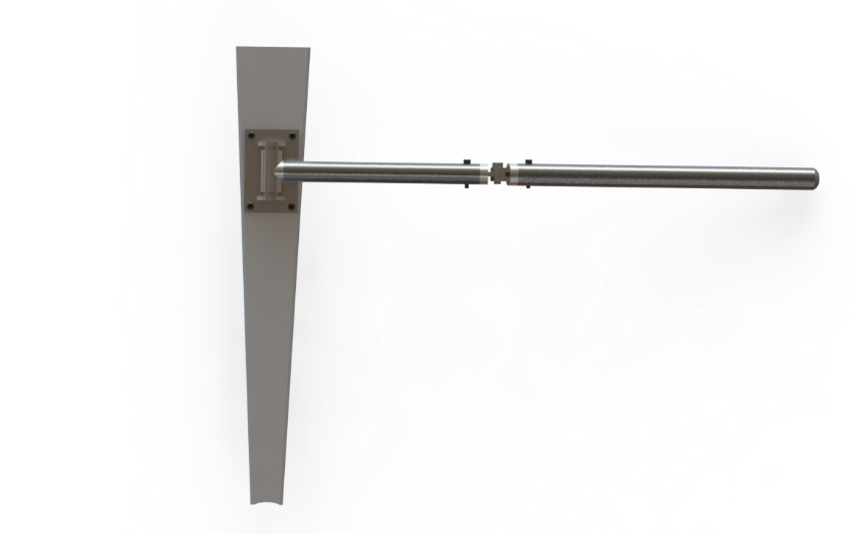
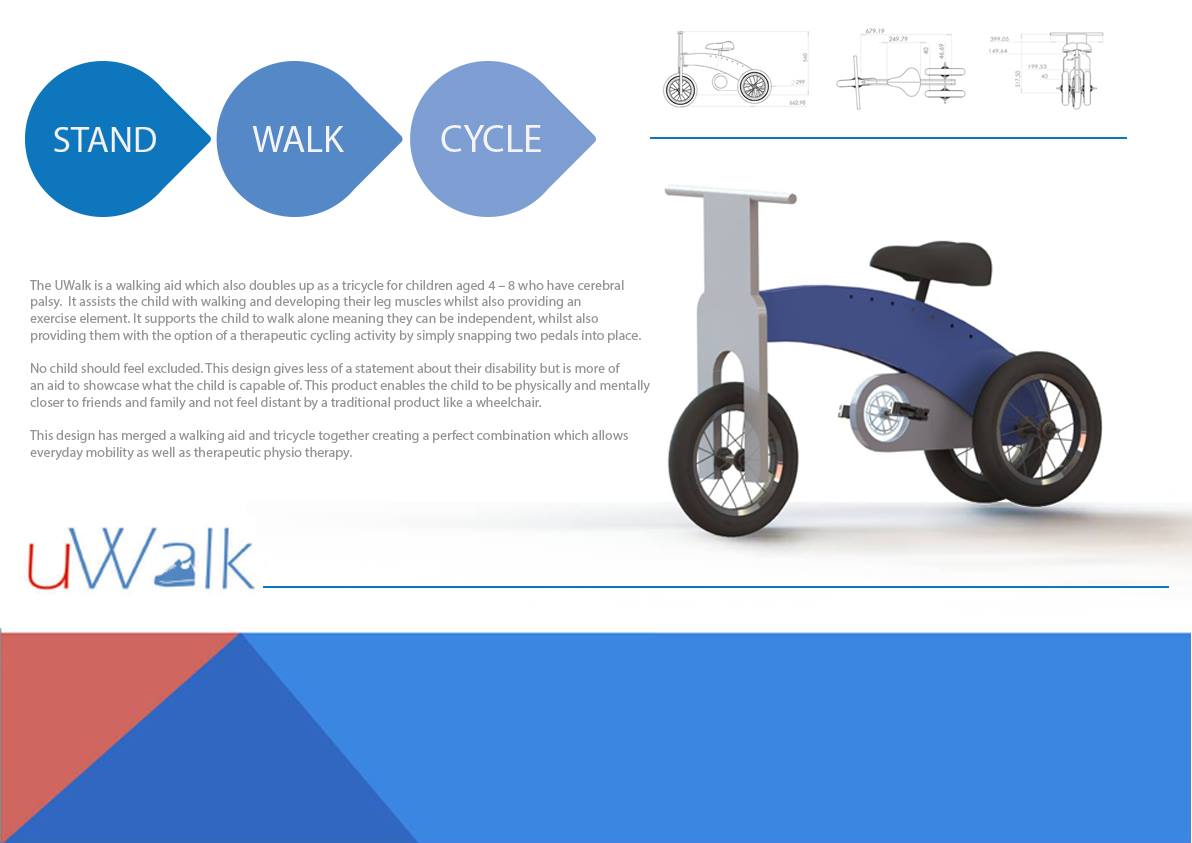
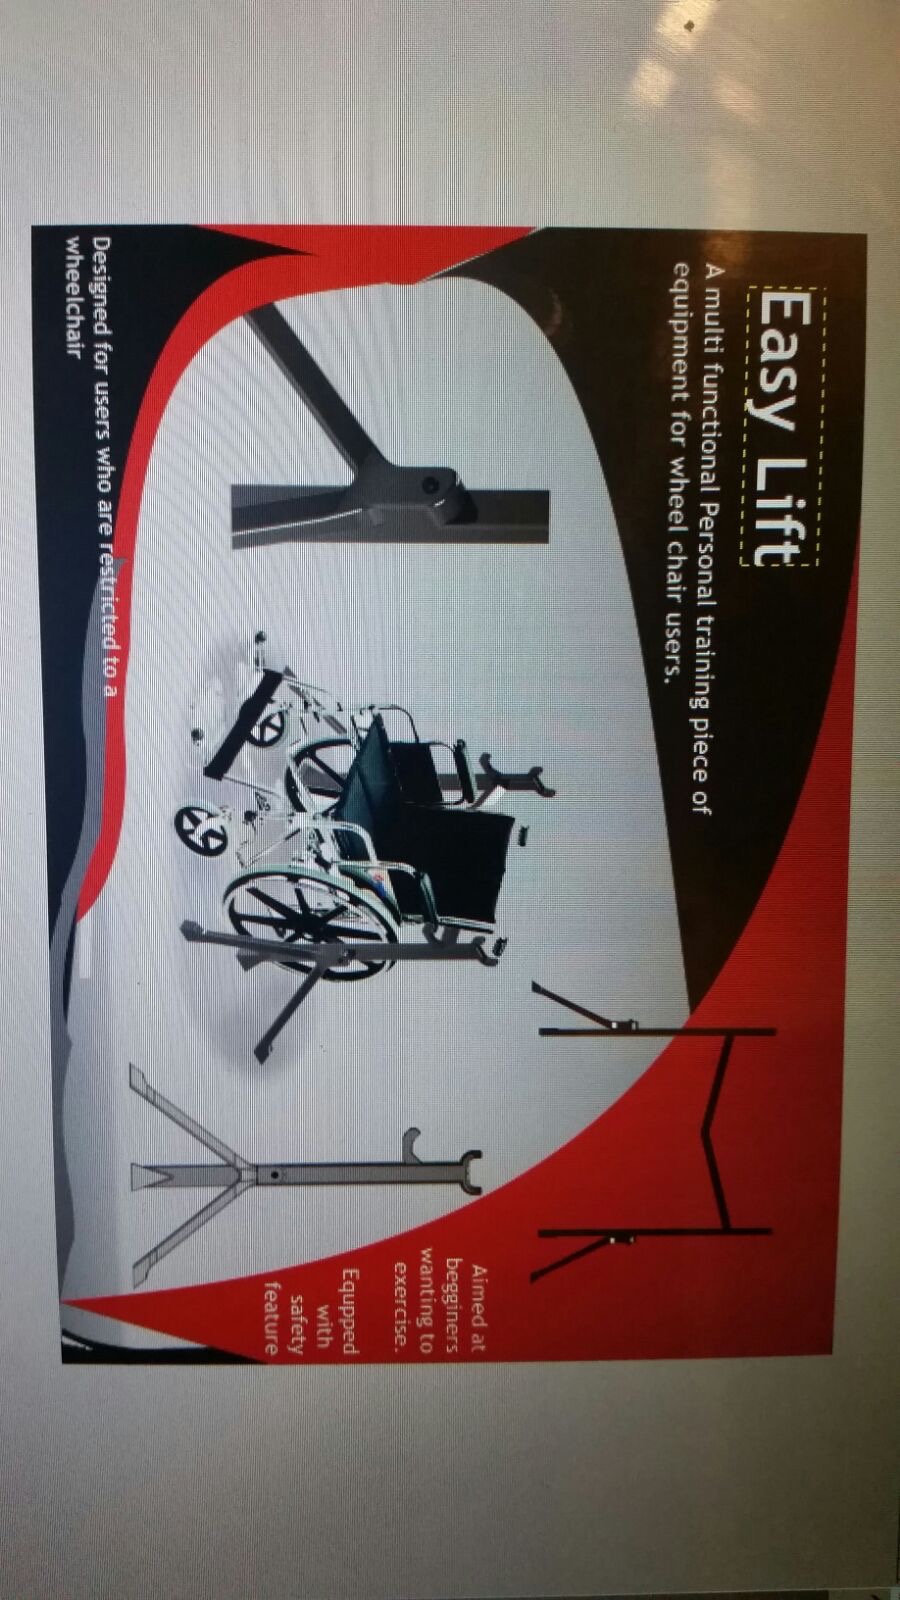
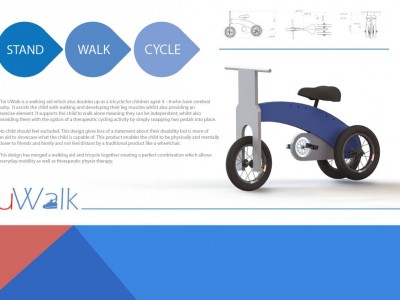
You are browsing the archive for Cracked It | 2015 November.

The Reserve, A wheelchair mounted Tennis ball feeder

November 28, 2015 in Post

board board2Hey Everyone.

We have designed a product called the reserve to allow wheelchair bound people access to backup tennis balls during their tennis game without having to call for outside help having to reach down into awkward positions. This product was designed to help the game flow smoother and to allow the players to continue with their game without having to stop for longer periods of time just to restock on balls.

The reserve in its basic form is essentially a hollow polymer tube with enough space for 4 balls to be held with a little space at the top, underneath the balls is a disk with a spring mechanism to push the balls up towards the top of the tube where a catch switch is located to stop the balls from escaping. On the side there is slot that allows the player to see how many balls are left inside the reserve and plan accordingly. The spring mechanism is equipped with a small handle on the side to allow the player to pull back the spring and allow the player to restock the product without difficulty.

The clips on the side of the reserve are fully adjustable to allow it to clip onto many different kinds of wheelchair without any problems because we realise that there are many different varieties of wheelchairs that are available to people to use. When the reserve is clipped on it is firmly gripped in place and will not move. It can however be moved side to side by the played to be placed somewhere to be accessed easier to each particular player depending on their preferences.

On top of the reserve there is a catch switch that prevents the balls from escaping the tube while the product is in use. To allow the player to access one of the balls inside, he or she must simply press on the release switch with a thumb or finger and it will push it back and out of the way temporarily for enough time to allow the spring mechanism underneath the balls to push one of them into the housing unit above. the player can then let go of the switch and it will return to its original position and lock the remaining balls inside the tube.

One of the main reasons that chose this particular area to design for was that we noticed a distinct lack of existing products that dealt with the problem. from primary and secondary research we noticed that many players just held the ball around their person and about 70% of them simply stuck their spare balls in the spokes of their wheelchair. not only could this damage the balls but it could possible impair their ability to play or damage the wheel itself. This is why we designed the reserve to allow players access to their spare balls without problems or damage to player or equipment.


Easy-Bin Wheelchair Aid

November 25, 2015 in Solution

Easy-Bin Presentation BoardEasy-Bin Story Board

An aid to assist wheelchair users when taking out the bin

The Easy-bin wheelchair aid is an simple but effective solution to taking the trash out for people in wheelchairs. It allows the user to take the trash out while still having full control of the wheelchair and being able to navigate tight spaces with ease.

Research has shown us that wheelchair users who live fairly independently find it hard to take out the rubbish.  This is because you need two hands to push a wheel chair so it is hard to push it whilst carrying a bin or bag, plus few people want to rest their rubbish on their laps. We were able to speak to man living in America, who makes a variety of YouTube videos showing his daily struggles, about how he takes out his trash. He was able to give us insight on how to develop a product which solves this issue.

The final solution we have come up with is a combination of arms and hinges which are permanently attached to a dustbin and then lifted up and attached to a wheelchair. The arm has the ability to fold up against the bin and clip into place, this keeps the product compact and out of the way. When the user wants to take out the trash all they do is simply go to the dustbin, unclip the first arm, lift the bin up and slot the arm into the attachments on the wheelchair, they can then twist the bin around in front of their legs.

To test the product we made a model and once was made we acquired our wheelchair and began to test our final outcome. The process of utilising our product starts off with the user travelling towards the bin lifting it up and clipping the bar in the clips attached to the wheelchair. Connecting the bar to the clips wasn’t a smooth process when we tested it but it was a simple process. Baring in mind we intend to make the actual product out of a metal such as aluminium because metals tend to have a more polished surface finish, so there would be less friction between the bar and the clip. Therefore connecting the pieces together should be a smother process.

Picture1 Picture2 Picture3  Picture4Picture5 Picture6

Finally we tested if you could utilize the wheelchair with our model attached. Because the bin can placed in front of the user it doesn’t cause much of an obstruction. We discovered the wheelchair was still usable with our attachment on and the performance of the wheelchair seemed the same as before which is dependent of the users physicality.

Manufacture:

This product uses material and components that are easy obtainable from any hardware or DIY store. This means that actually making the product is simple because it mostly involves attaching components in various ways.

For a dustbin with dimensions of: 600mm x 400mm x 400mm

Picture7 Picture1

The size of the product is very dependent on the size of the dustbin and wheelchair being used. These three components are the most varied and would need to be adjusted. The rest of the components would be bought in as standard parts.

More information about the manufacture and component parts can be found in the report below.

Report

Deodorant Helper

November 24, 2015 in Solution

How to make a handle for roll on deodorant

Step-by-step instructions; how to make a handle for roll on deodorant. Useful if it’s difficult to grip the bottle or hold it at the angle needed to get the deodorant in the right place. This handle could also be useful for other household tasks because of it’s simple clip holder. If you discover another use take a picture and share your tips in the comments!

DSC_0342small

Materials:

Tools:

  • Pliers
  • Junior hacksaw


Method:

  1. Insert the threaded rod into the hole in the tool clip. Use one nut on either side to secure it in place, tighten with the pliers if necessary.

DSC_0305small

2. Mix a small amount of epoxy glue and cover each nut to make sure they won’t loosen over time. Leave to harden.

3. Use the pliers to bend the threaded rod into a curve. Test the handle with a deodorant bottle to find the correct angle to easily reach the underarm.

4. Trim the threaded rod using the hacksaw if it is too long. People with smaller hands might find a shorter handle is easier to hold.

DSC_0315small

5. Use some of the lightweight air dry clay to mould the handle. Make a sausage shape and push the threaded rod inside. Use your hand to shape the clay and make the handle comfortable to hold. Use 2 small balls of clay to cover the sharp edges of the tool clip that could scratch. Leave everything to dry for at least 24 hours. (Don’t dry in the microwave because of the metal parts!)

DSC_0414small

6. Paint the handle with acrylic paint or spray paint to make it wipe-clean. The clay is porous before painting. Here are just a few ideas:

SmithLynnetteMIBImage

7. To make the handle more ‘grippy’ dip it in Plasti-Dip and leave to cure.

8. The handle is ready to use! Slip the tool clip over the thinnest part of the deodorant bottle, take off the lid and put some on!

DSC_0378 copysmall

DSC_0407small


uWalk – Design walking aid which also doubles up as a tricycle for children aged 4-8 who have Cerebral Palsy.

November 19, 2015 in Solution

12248495_10153399171468425_1985227518_o

12255644_10153399171493425_470869196_o

The Final Product

We have redesigned a walking aid for children diagnosed with Cerebral Palsy. We have focused on the age range of 4 – 8 years old. The aim of this product is to provide help to the children with the condition in everyday mobility difficulties. We understand that there are currently a wide range of successful mobility devices for this condition however, we found these products not be user friendly or aesthetically pleasing.  For this reason we redesigned the cerebral Palsy walking frame and chair, and incorporated a tricycle to allow the user to cycle. This is a common therapeutic hobby for children with cerebral palsy, so we thought it was an appealing and necessary element to add to the product.

Features and Functions

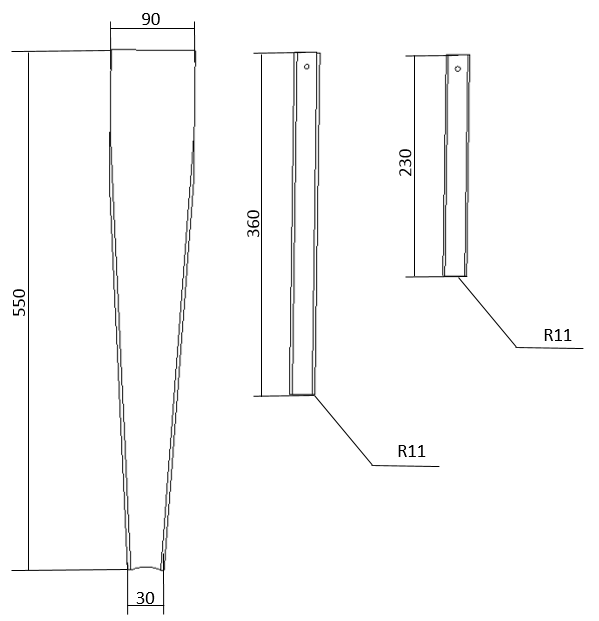
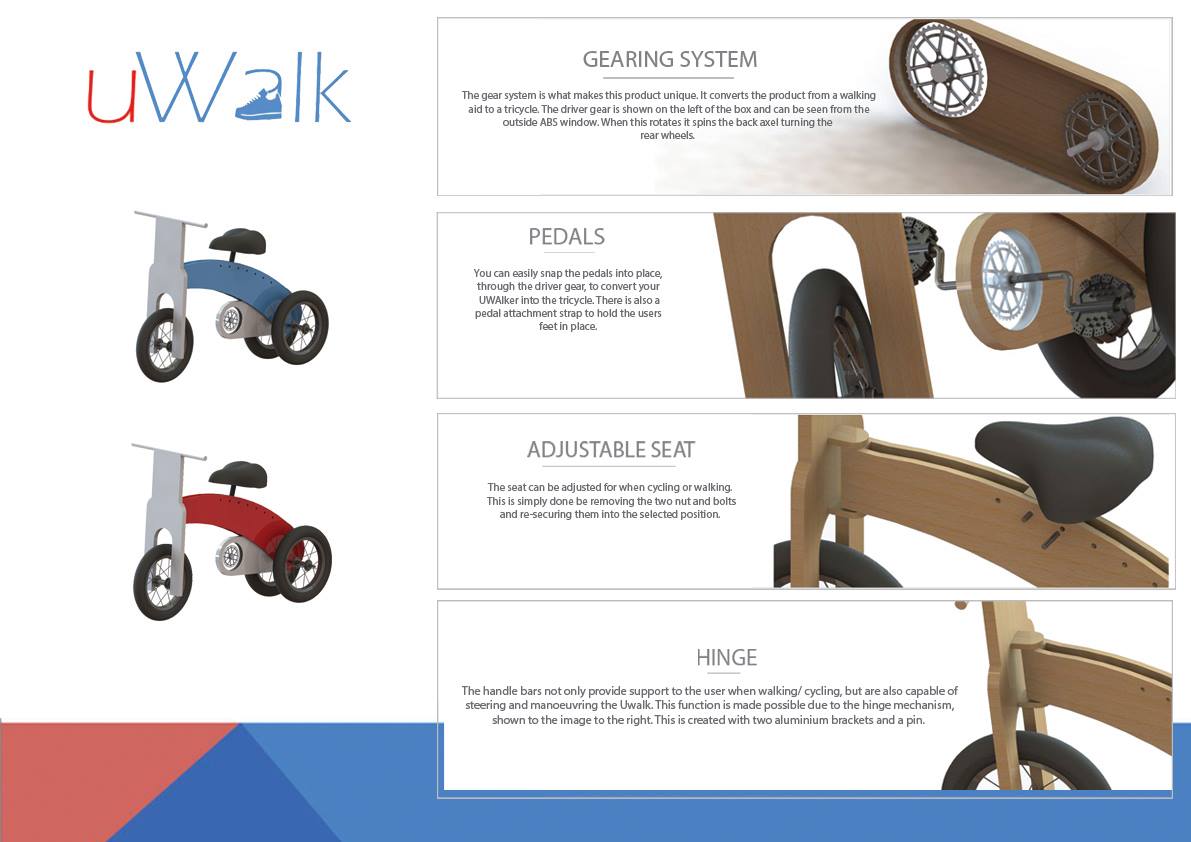
The final product is displayed in the image to the left. The product is constructed from 5-layer plywood. Using plywood provides many benefits to the products function. Not only is it widely available, but also it is also durable and strong, meaning it can with stand the weight applied from the user. We decided to use specific plywood, which is bonded with a synthetic resin, as this then makes it waterproof.

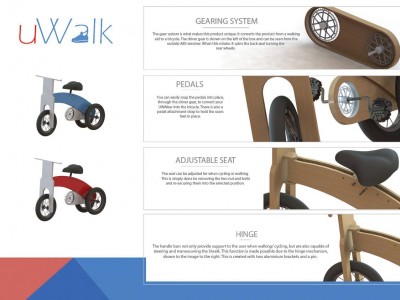
The product includes adjustable seating to allow the user to change mobility methods, from walking to cycling. The purpose of this is to create a more suitable distance when the user wants to use the pedals. This is adjusted using the holes for the pegs that run down the main frame. The user will remove the pegs provided and align the seat in to the position that best suits the, before reapplying the pegs into the holes to secure into place.

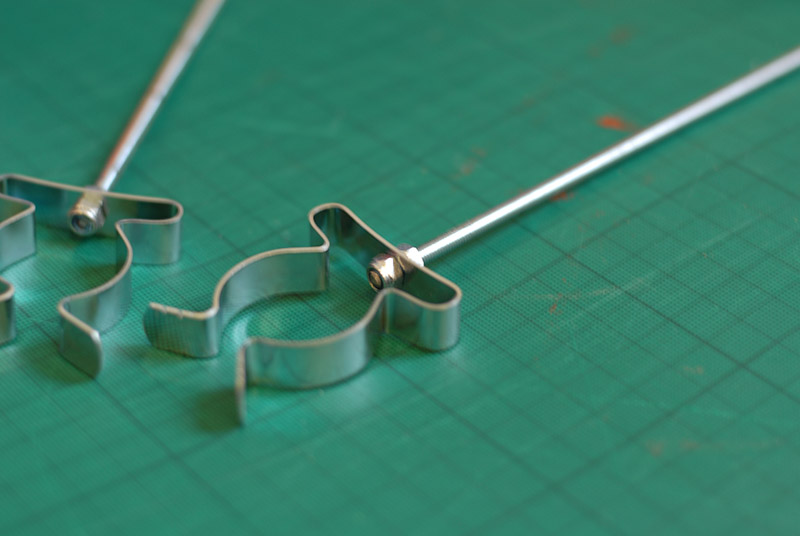
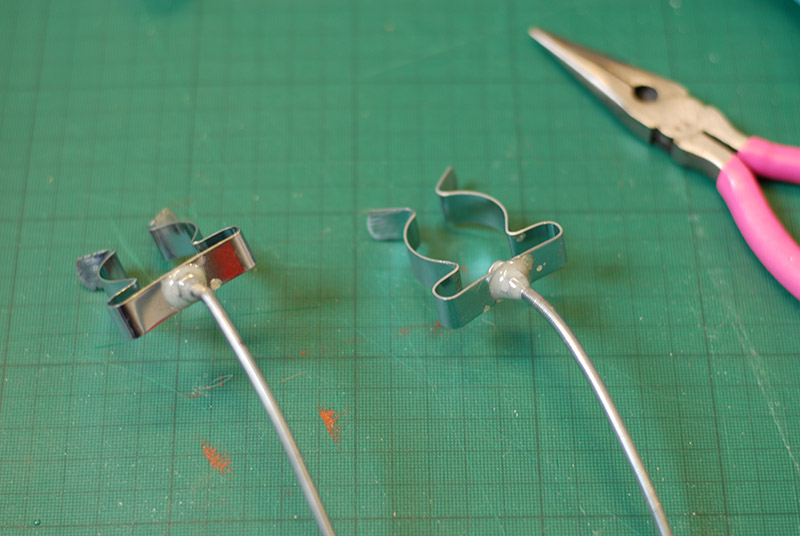
The products steering works through a hinge system constructed using a sheet metal bracket that turns on a vertical axle. This is shown in the image displayed on the left. The joints on the image to the right are attached to the back of the front panel. These are handmade pieces, which are screwed to the surface of the front panel. A 3mm steel bar is then inserted through all the joints. Not only does this hold the two sections together but it also creates a pivot.

The gear system is what makes this product unique. It converts the product from a walking aid to a tricycle, simply by inserting pedals into the driver gear.

The cross sectional view on the image to the left shows how this mechanism functions. The gear on the left is the driver gear. This can be seen from outside the casing through the transparent ABS laser cut window. This is connected to the following gear with a bicycle chain. Both the driver gear and following gear are the same size with the same number of teeth. This means how many rotary motions the driver gear is turned, the following gear will turn the same amount of rotations. The back axle holds two fixed wheels on either side of the gear casing. This if for added stability and balance when the user is walking. The back axle is also fixed to the follower gear to allow the wheels to turn when the driver gear is moved with rotational movements from the pedals. This axle is made using 10mm steel tubing (hollow, wall thickness 3mm).  All wheels from this product are up-cycled children’s bicycle wheels. The front wheel of the product is an up-cycled child’s tricycle wheel. The actual wheel itself is not fixed to the front axle. Only the bearing section is attached. This allows the wheel to rotate without the axle turning. This was useful because the front frame has very little space to attach a rotating axle to. Instead the axle was bolted straight to the back of the frame. The front axle is made from 5mm steel. It was turned and cut on the lathe to get it to the correct thickness and length.

Anthropometrics and Data

Anthropometrics influenced the design majorly when looking at what shapes and sizes to use for the frame and wheels. We had to consider a number of aspects in the design and how they would vary depending on the users sizing. Looking at the highlighted area on the graphs to below, it indicated our target markets (4-8) average weight and height.

Manufacturing processes

Manufacture for the frame is relatively easy. This is one of the main benefits of using plywood, as it is so easy to machine. The main body, front panel and gear box casing are all laser cut from a sheet of five layered Plywood. A laser cutting machine uses less energy to run than most alternative methods, whilst still being efficient to maintain. They are also designed to run without human supervision making it very time effective. If a laser cutting machine is not available, the parts can be cut using a band saw. Both processes would still require a hand finish to the edges for safety precautions. Sheet bending is required to form the bracket that will join the front panel and the main frame together. A brake machine will be needed to accomplish the 90 degree angles needed. This part could be brought in but is cheaper to manufacture if the machine is available.

How the product suits the user

There are many things to consider when designing for a young child with Cerebral Palsy. Every child will have different weak points in their body and we must make sure they have the support needed to overcome said weakness.

The bike is low riding and features removable pedals. By removing the pedals we are making it easier to walk with the bike as a support system, the pedals would only obstruct the movement of the child. Having a lightweight support system with a seat means that when the child gets too tired from walking they can rest and sit. They could even sit while pushing themselves along.

On the pedals we have included a strap to secure the foot to the pedal. By doing this we making it easier for the child to continuously make a cycling motion without worry of trying to keep their foot on the pedals.

Due to it being a tricycle, and having three wheels, there is more stability than if it were just a bike with two wheels. This means that the child does not need to balance the bike; in fact the bike will provide balance for the child. Having this extra balance has mean that we can have pedals that the child straps into as there is no worry of them losing balance and toppling the tricycle.

The handlebars have to be appropriate for both cycling and walking. So we considered if it had to be extendable or not, and after taking anthropometrics into consideration we designed the correct distance for the user meaning there was no need for the extension.

The seat has to have the most support, requiring mainly lower back support. It is cushioned and padded in the required areas for maximum comfort and support. The seat is adjustable so that it can be put in five positions to suit the use, whether this is using the product as a walking aid or as a tricycle.

We have made sure that the tricycle has a very low centre of gravity and is extremely stable, this is highly important as if the child were to lose stability and lean, or become ridged it is important that the bike will not tip over. We want the user and their parents to have complete confidence in the aid.

From our research of existing products we saw that they all seemed very clinical and not very child friendly. To make our product more appealing to a young child we have chosen materials that can be coloured easily, making it available in many colours. We focused on primary colours initially to show how simple colours can make the bike stand out.

We are also hoping that as it is wood we could provide the child with stickers so that they can even personalise their bike, as it is wood the stickers could be easily sanded off and painted over if the child changed their mind on what they wanted on their bike. Our product encourages the child to walk from an earlier age, building muscles, flexibility and confidence. When muscle is built and exercised more often the child is less likely to have stiff muscles, which can be extremely painful.

“Physical therapy empowers the child physically and emotionally, and sets the stage for entering adulthood as an independent individual.” (What are the benefits of physical therapy?)

Redesigned Therapeutic Saddle: NTU DEMAND Brief

November 19, 2015 in Solution

Storyboard             Presentation-Board

Research Report

Hello everyone, we’re team adam and we’d like to introduce you took the result of therapeutic saddle project.

Our product gives disabled children a safer seat on horse back and brings the legs as close as possible to the horse. The warm temperature and the movements of the horse relaxes the rider’s legs and spastic muscles, as well as easing stiff joints.

We focused our product on a young boy called Thomas, who is 11 years old and has spasticity in both his legs. He started hippotherapy half a year ago. And even now after that short time period, his movements are becoming more controlled. After a therapy session he can even walk without his walking frame for a short time.

However. there are some issues that are clear with the therapy sessions, the biggest one being the saddle. The current saddles specifically for hippotherapy are mainly just made for the child to lie on. This is not good for the rider, horse or therapist. If the rider is unbalanced on the back of the horse, he could cause discomfort for the animal, thus the situation becomes much more unsafe, this then results in the therapist not being able to provide thorough sessions due to having to worry about the state of the horse and the rider way more than they should.

Therefore we have managed to design a lightweight, soft, multi-purpose saddle to help provide support for the therapist, and child resulting in a more effective session for the rider. We really wanted to make the whole experience something more for the 3 users involved with this process. A normal day in the life of a disabled child is filled with limitations, as soon as they get onto the horse they become empowered. This feeling is what drives a lot of the kids at the RDA groups and really inspired us to create a fantastic product.

A way to get more disabled people involved in exercise?

November 16, 2015 in Challenge

IMG_1564 IMG_1565

I have been given a design brief at university to design a new piece of sports equipment for a disabled person to help them get more involved in sport and exercise and I have decided to go in the direction to help people in wheelchairs as there aren’t many gyms that are wheelchair accessible.

I have also found out that not many wheelchair users go to the gym as they feel embarrassed at the gym.

If you have any suggestions on what I could design to help wheelchair users get more involved in exercise I would appreciate it.

Skip to toolbar