You are browsing the archive for Cracked It | design.

Cozy IV-Friendly Tunic

August 30, 2021 in Solution

https://drive.google.com/file/d/1qtNuj-c3gyw96nG-MNVWWNFCMZgcGdxc/view?usp=sharing

I developed this design for my own hospital stays. When you have an IV for an extended period, adding or removing warm layers requires unhooking your line.

This tunic completely unfastens down both sides so that you can take it off or put it on while one arm is tied to an IV pole. The panels wrap from the back around the sides to fasten in the front so that you can lie on your back or either side comfortably without the fasteners causing irritation.

I have used fancy buttons and trim. You could easily make a plain tunic and fasten the sides with snaps, velcro, ties, or separating zippers depending on what’s easiest for you.

Zocus assistive camera lens adjuster

June 21, 2017 in Solution

Zocus camera

Originally posted here

Download the digital files for 3D printing

For assembly instructions follow the tutorial on Instructables

Remember to click the “This Solution Helped Me” button at the top of this page if you give this a try!

FleXiseat floor seat

January 27, 2017 in Solution

F41EGNZHVXPR9YQ.MEDIUM

This DIY product is designed for a three years old boy that was born with cerebral palsy. He has an inadequate trunk control so he can not sit independently, he would fall on his side.

At home he sits in a custom tailor made seatshell. But this is too big to take everywhere along. His parents like to go out by bike to friends or family, but there is always the problem that they can’t let hem sit on a normal chair to play with other children.

The question of the parents was to make a chair which is foldable, easy to carry, giving enough support so that the boy can sit straight and play with his friends, but still compact to put in the bicycle bag.

A shot movie, following on the intractable, will explain the advantages of the seat.

Step 1: Materials needed

Materials needed

Step 2: Saw the wooden pieces

Saw the wooden pieces
IMG_4978.jpeg
538cc736d535cf13ee000043.jpg
538cc7dad535cff93f00008f.jpg

Buy two different pieces of wood, a 3mm multiplex and a 15mm multiplex. Than saw two 395x300x4mm pieces and two 330x400x15mm pieces.
Drill holes in the 15 mm pieces; drill in a line 35mm of the border. The distance between two holes is 3 mm.Buy two different pieces of wood, a 3mm multiplex and a 15mm multiplex. Than saw two 395x300x4mm pieces and two 330x400x15mm pieces.

Drill holes in the 15 mm pieces; drill in a line 35mm of the border. The distance between two holes is 3 mm.

There have to be cut out rectangulars as well, this can also be done with a drill, by drilling holes close to each other.

Step 3: Attach a lath

Attach a lath

First there has to be sawed a lath 330x20X15, we attached this to one of the wooden pieces of 15 thickness, with an air staple gun but this can also be done manually.

Step 4: Connecting the wooden pieces

Connecting the wooden pieces

Weave the rope between the thickest wooden pieces by using the saddle stitch. This technique will ensure the proper firmness.

Step 5: Attach Foam

Attach Foam
L1060690.JPG

Attach the foam using an air staple gun or an manual stapler.

Step 6: Skai

Skai
L1060696.JPG

Attach the leather, by using an air staple gun or manually with a stapler.

Step 7: Handles

Handles

Stich handles and attach them onto the back of the wooden pieces.

Step 8: The back

The back
L1060744.JPG

Attach the thinner wooden pieces with some nails onto the backs of the seat, to hide the ugly staples.

Step 9: Add the straps

Add the straps
233293030.jpeg
538f15ef9d29c9a8fa00000d.jpg
L1060727.JPG

First make a finishing stitch around the openings for the buckles.

We used a support pants, because the child can not sit straight by himself. That little pants ensures support around the waist and helps him to sit up straight.

To attach the support pants, insert the buckles in the openings and secure them at the back with the clamping buckles.

Step 10: Make a fitting table

Make a fitting table
L1060733.JPG
L1060734.JPG

The table ensures extra stability for the child. The child can put his arms on the table and lean on it, this will make him sit up more straight by himself. He has to do some effort by himself with is better than a belt around his chest, because exercise is good for the child, otherwise he will get lazy which is bad for his muscles.

The table is made in the same style as the seat.

We used the multiplex. Dimensions:

– table leaf: 390x310x5mm
cutout for the belly: 260x150mm

– table legs: 310x210x5mm

To make the cutout for the belly, measure the waist of the child and see for yourself what the best measurement is for your child.

To put the table together, we used the same technique as the seat so we drill holes in the planks 20 mm of the borders. The holes are drilled 30mm from each other. For the plank, also drilling 20mm from the border and 30mm from each other.

For stability, we attached 4 laths again on the side planks, on each side plank, two laths. This laths are 18x15x310mm.

The planks are fixed to each other with rope again, we will do this in the same way as we did with the seat.

The loop that can be seen on the pictures has been stitched out of the skai and attached with staples onto the middle plank. This loop can be attached onto the support pants. This ensures that the table can’t be pushed away by the child while he is playing. This gives extra safety.

Step 11: Final result and team

Final result and team

You can find more information on our blog

Project made by:Carolle Geldof, Emily Quartier, Jaana Caes and Sahin Vanneste

Via Instructables

Be sure to click the ‘This Solution Helped Me’ button at the top of this page if you give this a try!

Yoghurt pot opener

September 22, 2016 in Solution

Via Pinshape

container_handy-tool-to-open-plastic-containers-contest-3d-printing-97149This handy 3D printable handle will help open those tricky pots of yoghurt, margarine, ice cream and more, why not give it a go!

Download the 3D CAD file

Remember to click the ‘This Helped Me’ button at the top of this page, or leave a comment letting us know how you got on!

Via Pinshape

Our favourite disability designs from 2016’s graduates

August 10, 2016 in Post

Our favourite time of year rolls around every July when the exciting projects that design students have been tirelessly working on over the past 9 months are finally revealed. (OK our excitement might have something to do with the sun coming out, but nonetheless it’s a wonderful time of year for design lovers)

We’ve been visiting degree shows around the UK to bring you our top disability design picks for 2016. Here goes!


1. A new take on the hearing aid

Saskia Schular Email
Facebook_Timeline_images_Hearing aids2
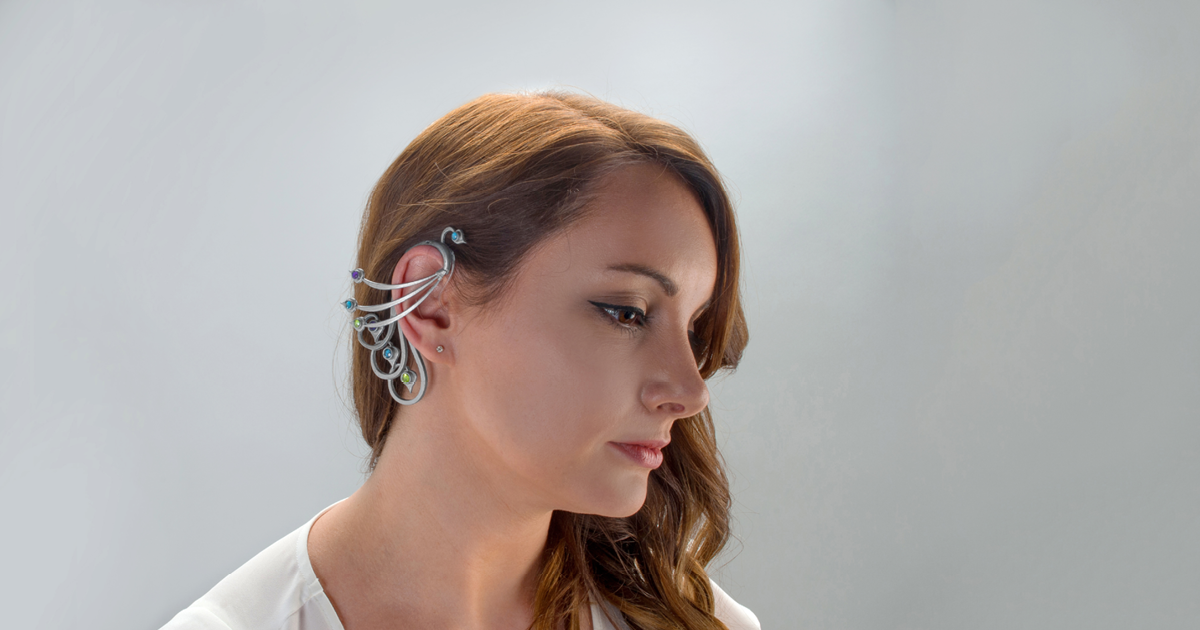
“There is social stigma around the use of hearing aids that prevents people from using them and can make them feel self-conscious when they do; only 1 in 30 adults wear a hearing aid when in reality 1 in 10 would benefit from using them.”

Saskia Schular is a young designer using her passion for jewellery fashion to create statement hearing aids that are anything but quiet.


Facebook_Timeline_images_Hearing aids


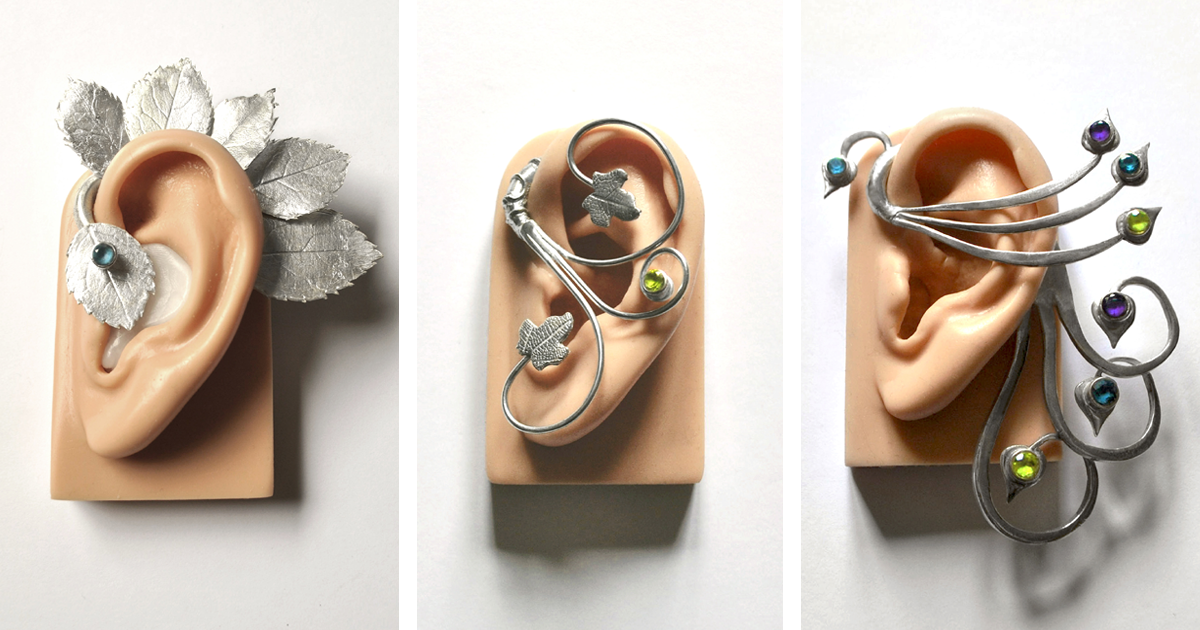
“The hearing aid has been redesigned to be worn with a range of covers, allowing users to decorate and express themselves through their hearing aids. The covers are attached by magnets which allow the user to change them easily and as often as they want. Designs that are ‘fun’, ‘elegant’ and ‘dramatic’ were created using visual metaphors; they ranged from subtle pieces to be worn every day to statement pieces to complete an outfit.”


2. An affordable robotic prosthetic

Ben Armstrong Website Email

Facebook_Timeline_images_Myo

“During my research I found amputees were being exploited by prosthetics companies, who were charging tens of thousands for prosthetic arms. I set out to reduce the cost of such prosthetics using a number of novel design concepts, which included 3D printing as well as lifting components from established industries.”

To move the elbow joint, Ben’s design features a motor manufactured in large quantities for the aerospace industry which dramatically reduces costs compared to existing robotic prosthetics.

“I managed to achieve a 98% cost reduction whilst improving the functionality of the arm, relative to the current market leader. The next stage of the project is to ensure it meets all the relative legal directives. Once this has been completed I plan to launch the project via open source networks. The aim is to allow amputees worldwide to benefit from the design.”


3. A tremor-friendly teapot

Suzannah Hayes Email LinkedIn
Facebook_Timeline_images_Stabilitea

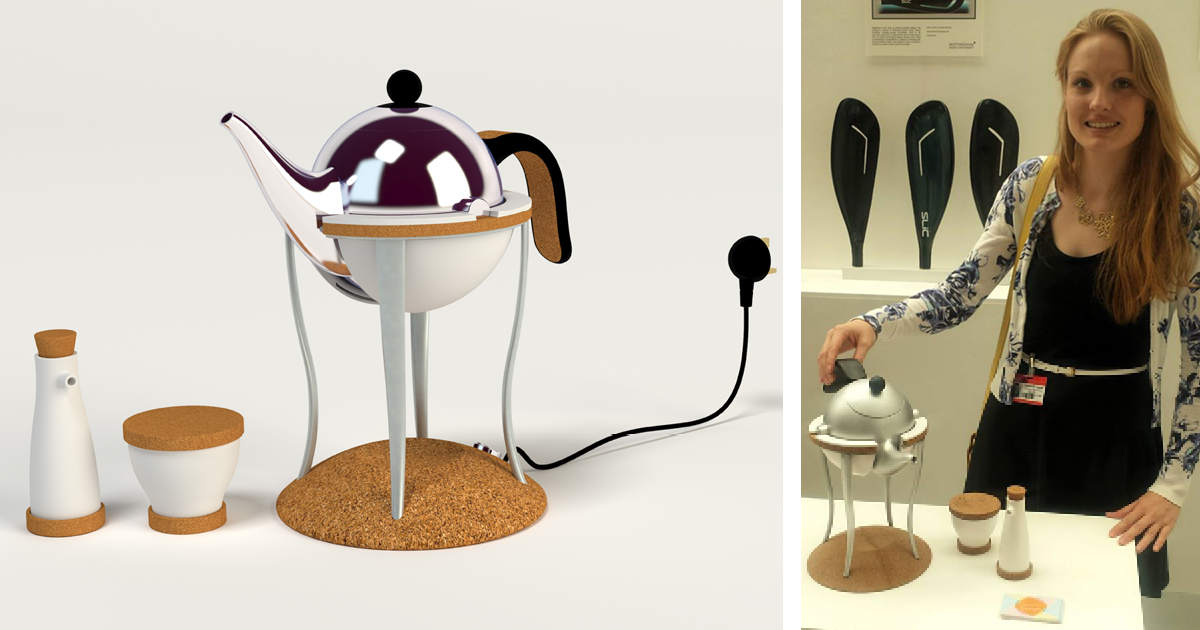
“Stability is a range of products including an induction heated teapot kettle, a milk jug and a sugar bowl, which provide a simple and stylish solution to help people with a tremor to safely make a hot cup of tea.”

Suzannah worked with physiotherapists and occupational therapists to design a kettle alternative that was safe to use but was also a stylish addition in the kitchen.

“The teapot itself is stainless steel and would be placed in a double layer ceramic bowl which has an induction coil. The handle would have a silicone cover to make it easy to grip and prevent it from being hot to touch. The legs would be aluminium so that they are not affected by the induction heating and therefore do not get hot and the base has been designed in a stylish and practical cork.”


4. New no-splash tyre technology

James Long LinkedIn
Facebook_Timeline_images_no more mudguards


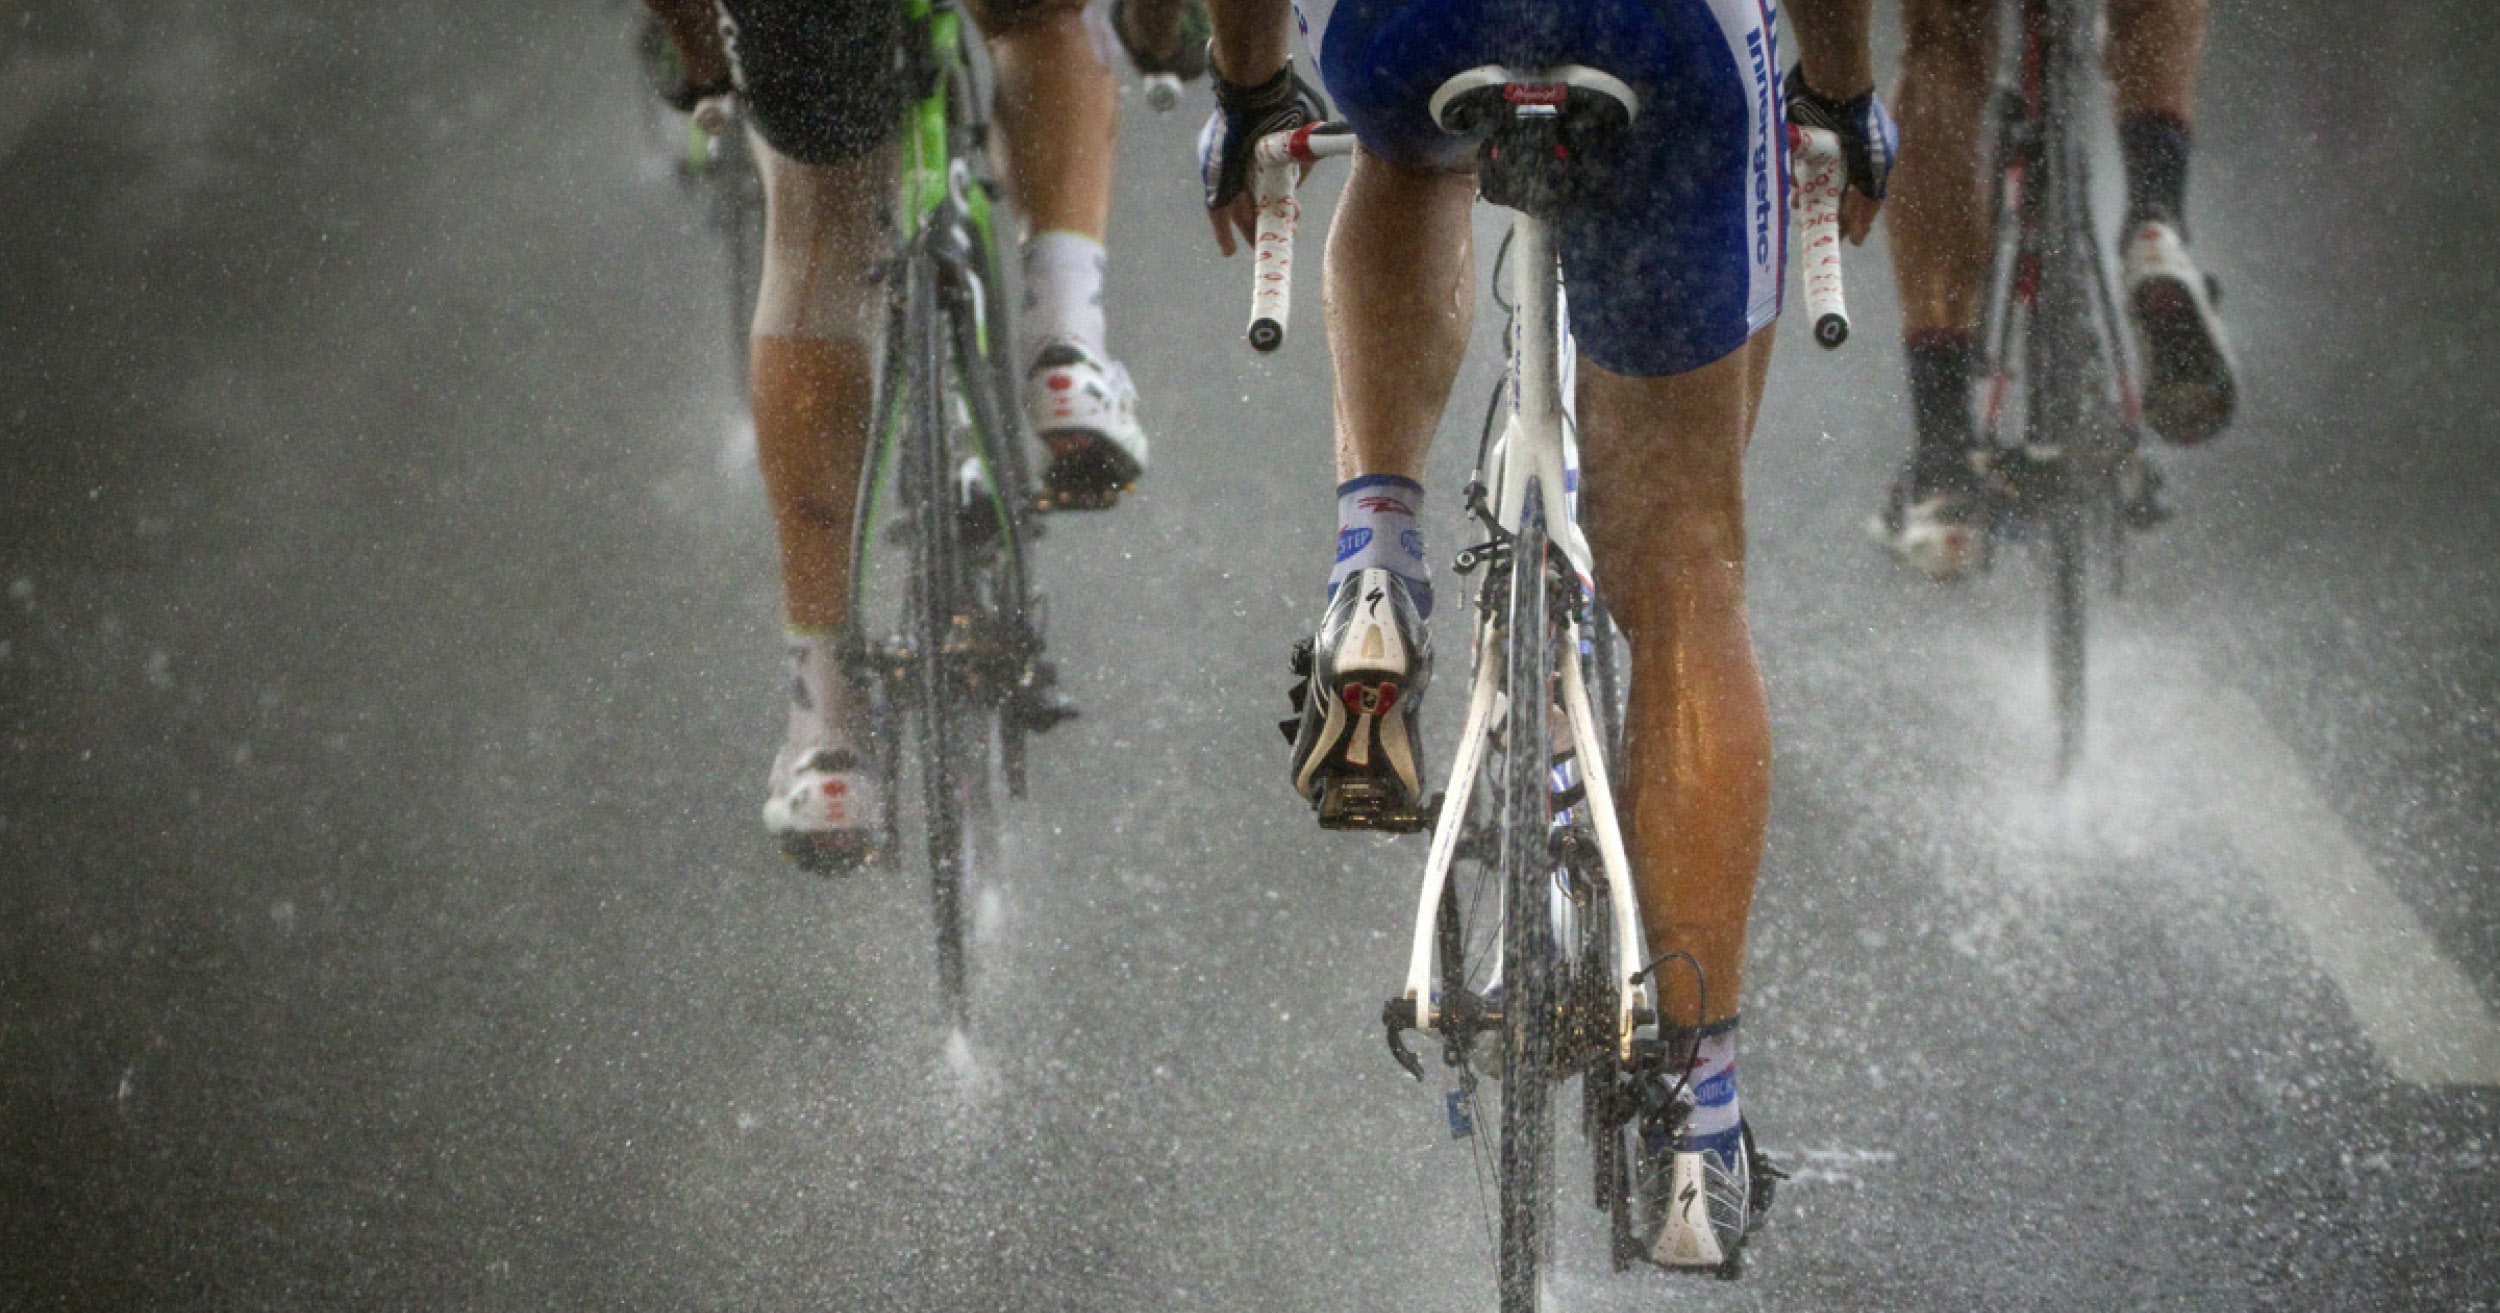
“The project investigates how a bicycle tyre can be redesigned to reduce the amount of spray created whilst cycling in the wet.”

“The project examines the utilisation of hydrophobic materials and distinct surface patterning. The outcome offers potential benefits within both the bicycle and automotive industries, however, the ultimate aim of the project is to improve the convenience and encourage the uptake of cycling.”

James used computer simulation and a testing rig to develop the new tyre design. We’re excited about the potential application of James’ new technology with wheelchair tyres, to keep both the wheelchair user and anyone pushing a wheelchair splash-free!


5. Rethinking the wallet for less nimble fingers

Emily Borton Email LinkedIn
Facebook_Timeline_images_Nimble_Accessories


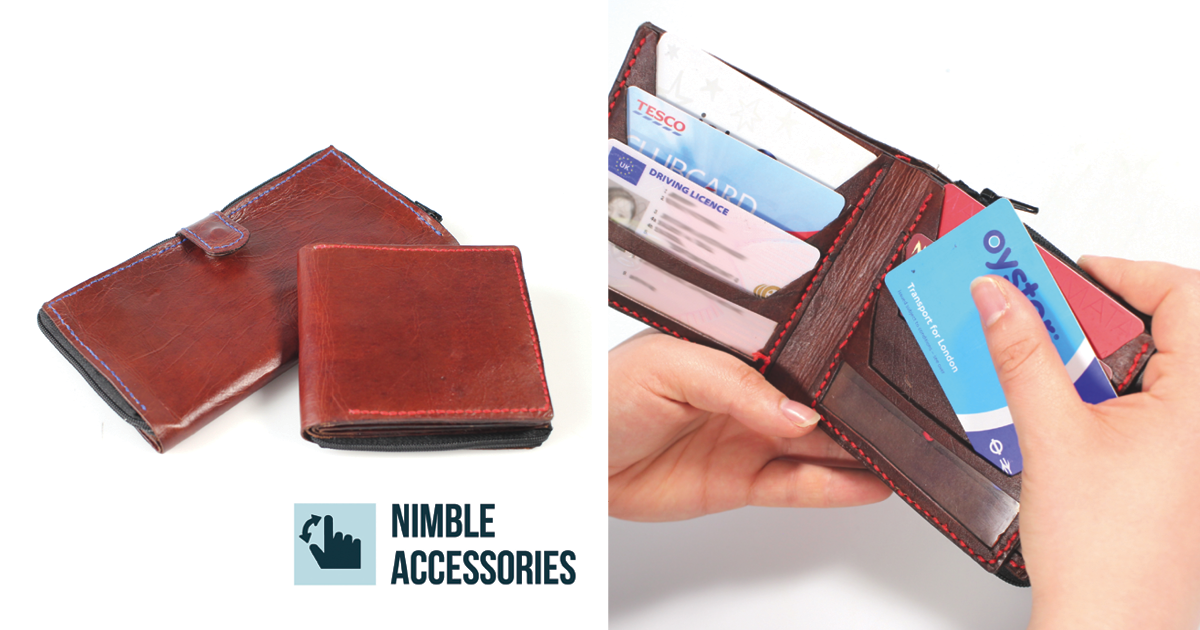
“Nimble Accessories is a range of purses and wallets designed to ease the stresses of shopping for low dexterity suffers. With the accessories designed to reduce the struggle when at the checkout, with simplifying access to coins and cards.”

Emily was inspired to create a Nimble Accessories after observing her aunt avoid shops because of worries about her ability to pay the cashier.

“Simple tasks, such as handing money over to the cashier, became stressful and she got very flustered. My aunt would rather ask family and friends around her to go to the counter to pay instead of facing it herself. It even came to the point of turning away from shops so she wouldn’t have to be seen or judged for her struggles by members of the public around her. ”


6. Improving intimate occasions for ostomates

Stephanie Monty Email LinkedIn
Facebook_Timeline_images_Ostomy Cover


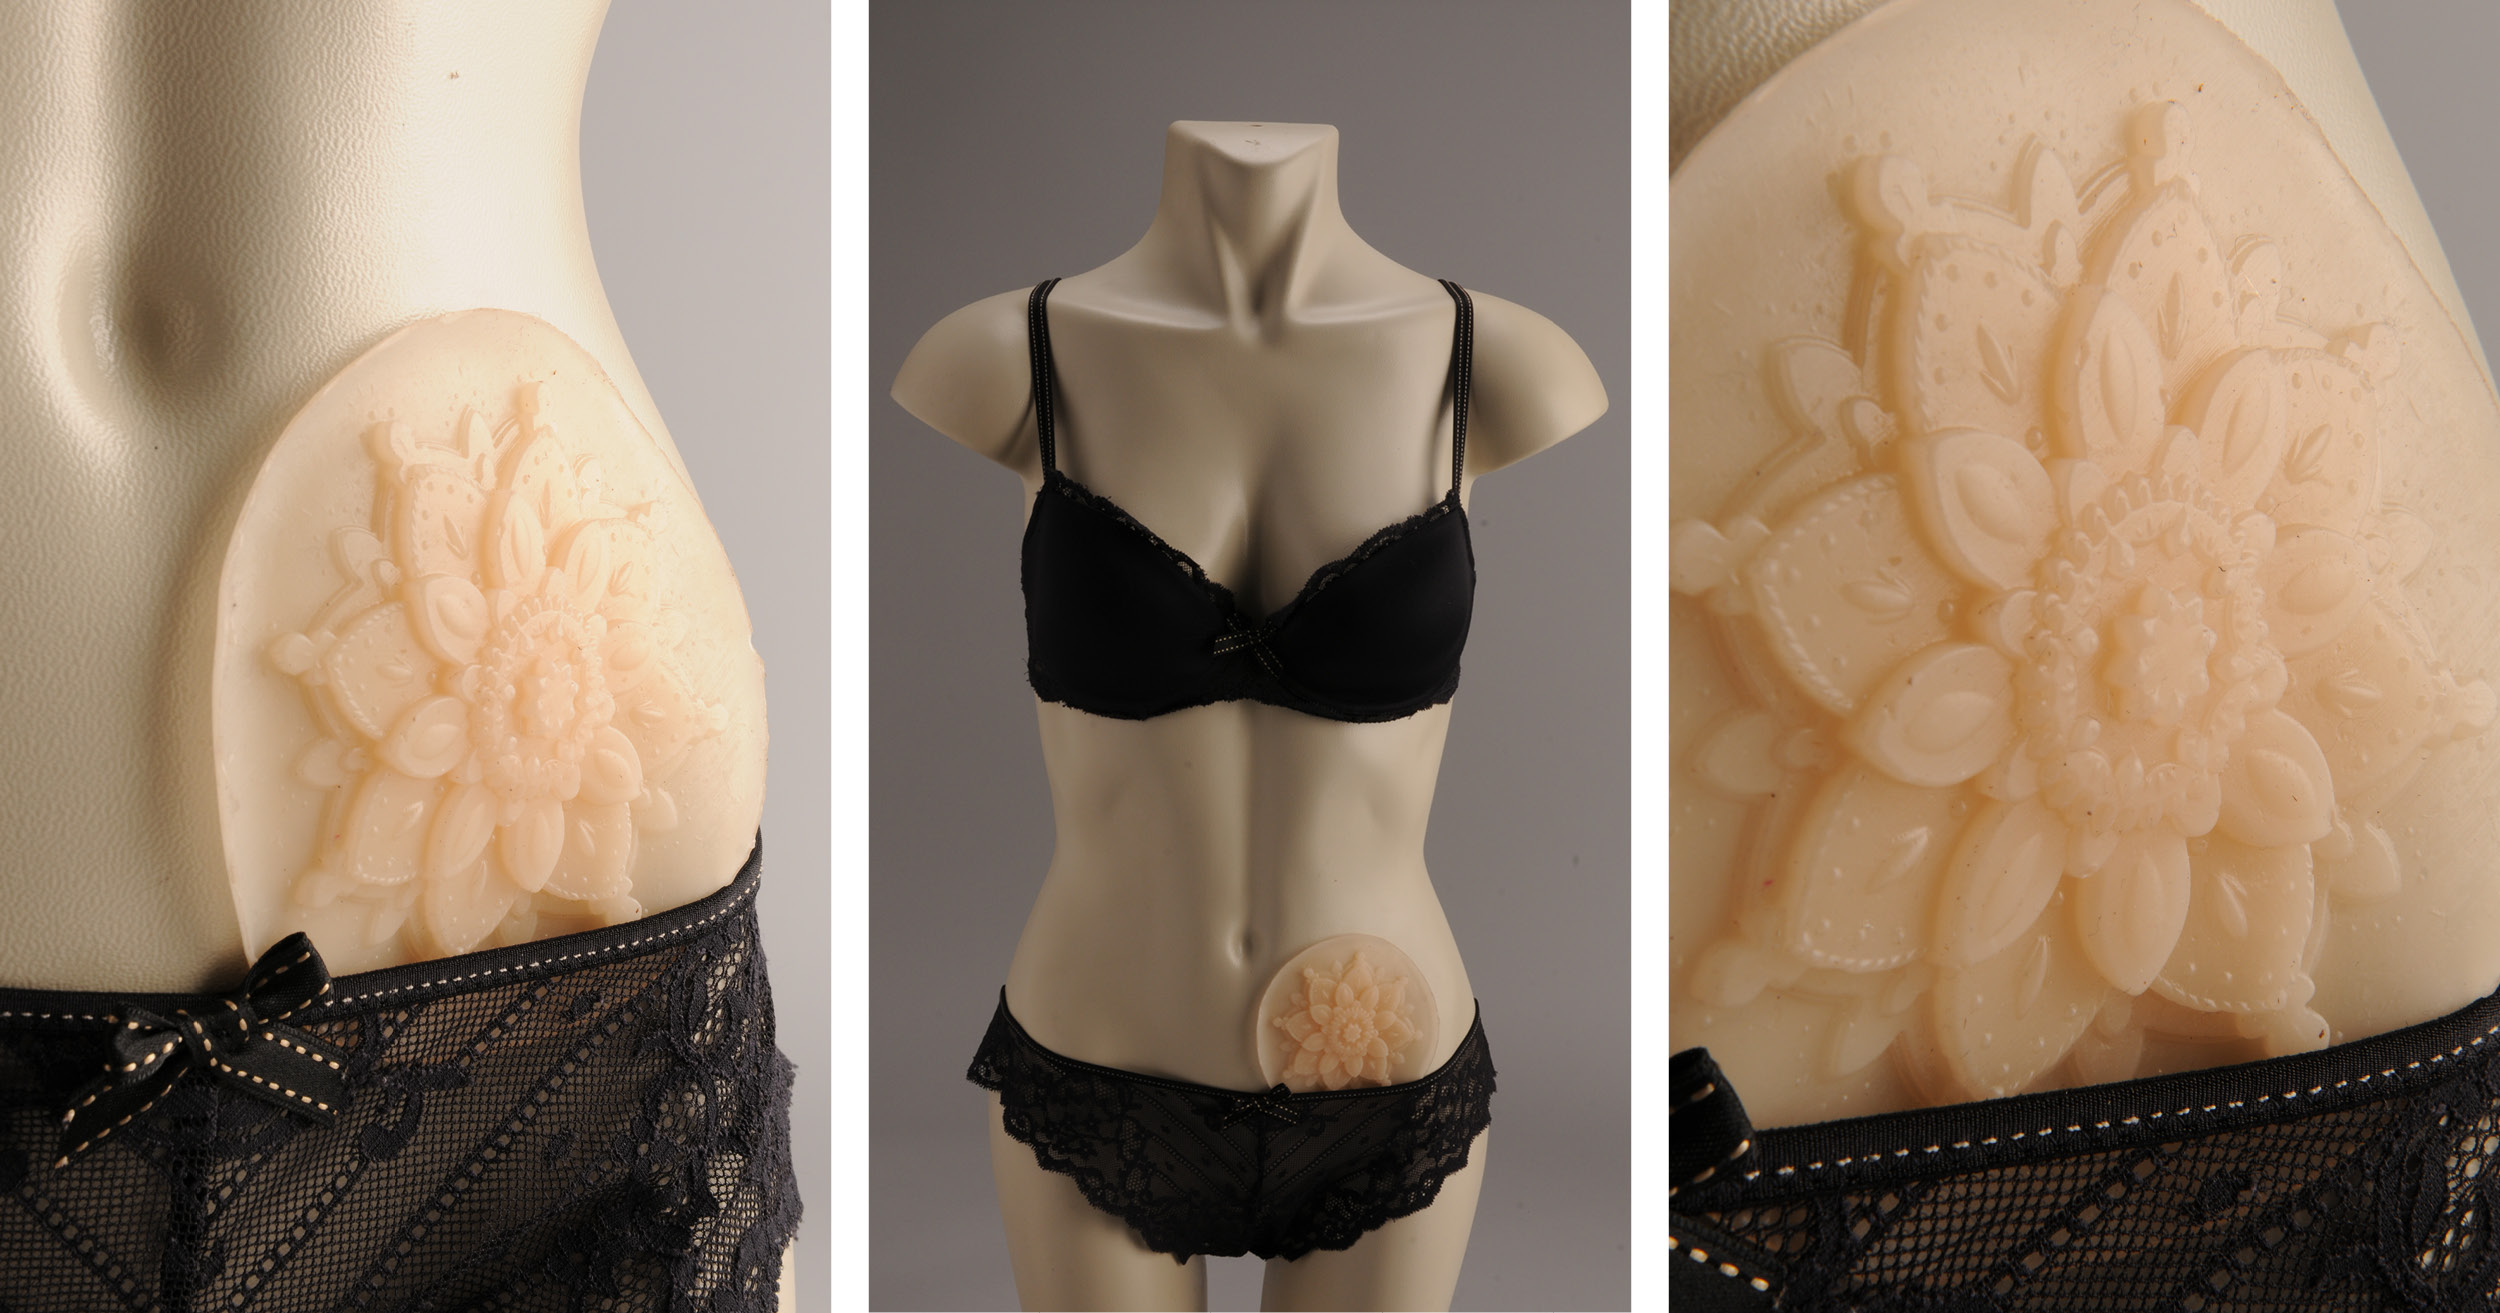
“This new appliance is designed for both men and women in intimate occasions. Users can choose from a range of embossed designs inspired by tattoos, lingerie and body art, whilst the unique manufacturing process means it can be personalised according to the individual’s medical requirements.”

Stephanie Monty was inspired to tackle this challenge by her family’s own experiences living with Crohn’s Disease.

“This appliance empowers people to feel more confident with their body and provides some freedom from an ostomy pouch. There are over 120,000 ostomates in the UK alone and despite a wide range of highly advanced appliances, outstanding issues with their functionality and especially their aesthetics merely compound the social stigma surrounding this subject.”


7. Timekeeping and navigation for people with visual impairments

Tom Yates Email Website
Facebook_Timeline_images_SquashWatch
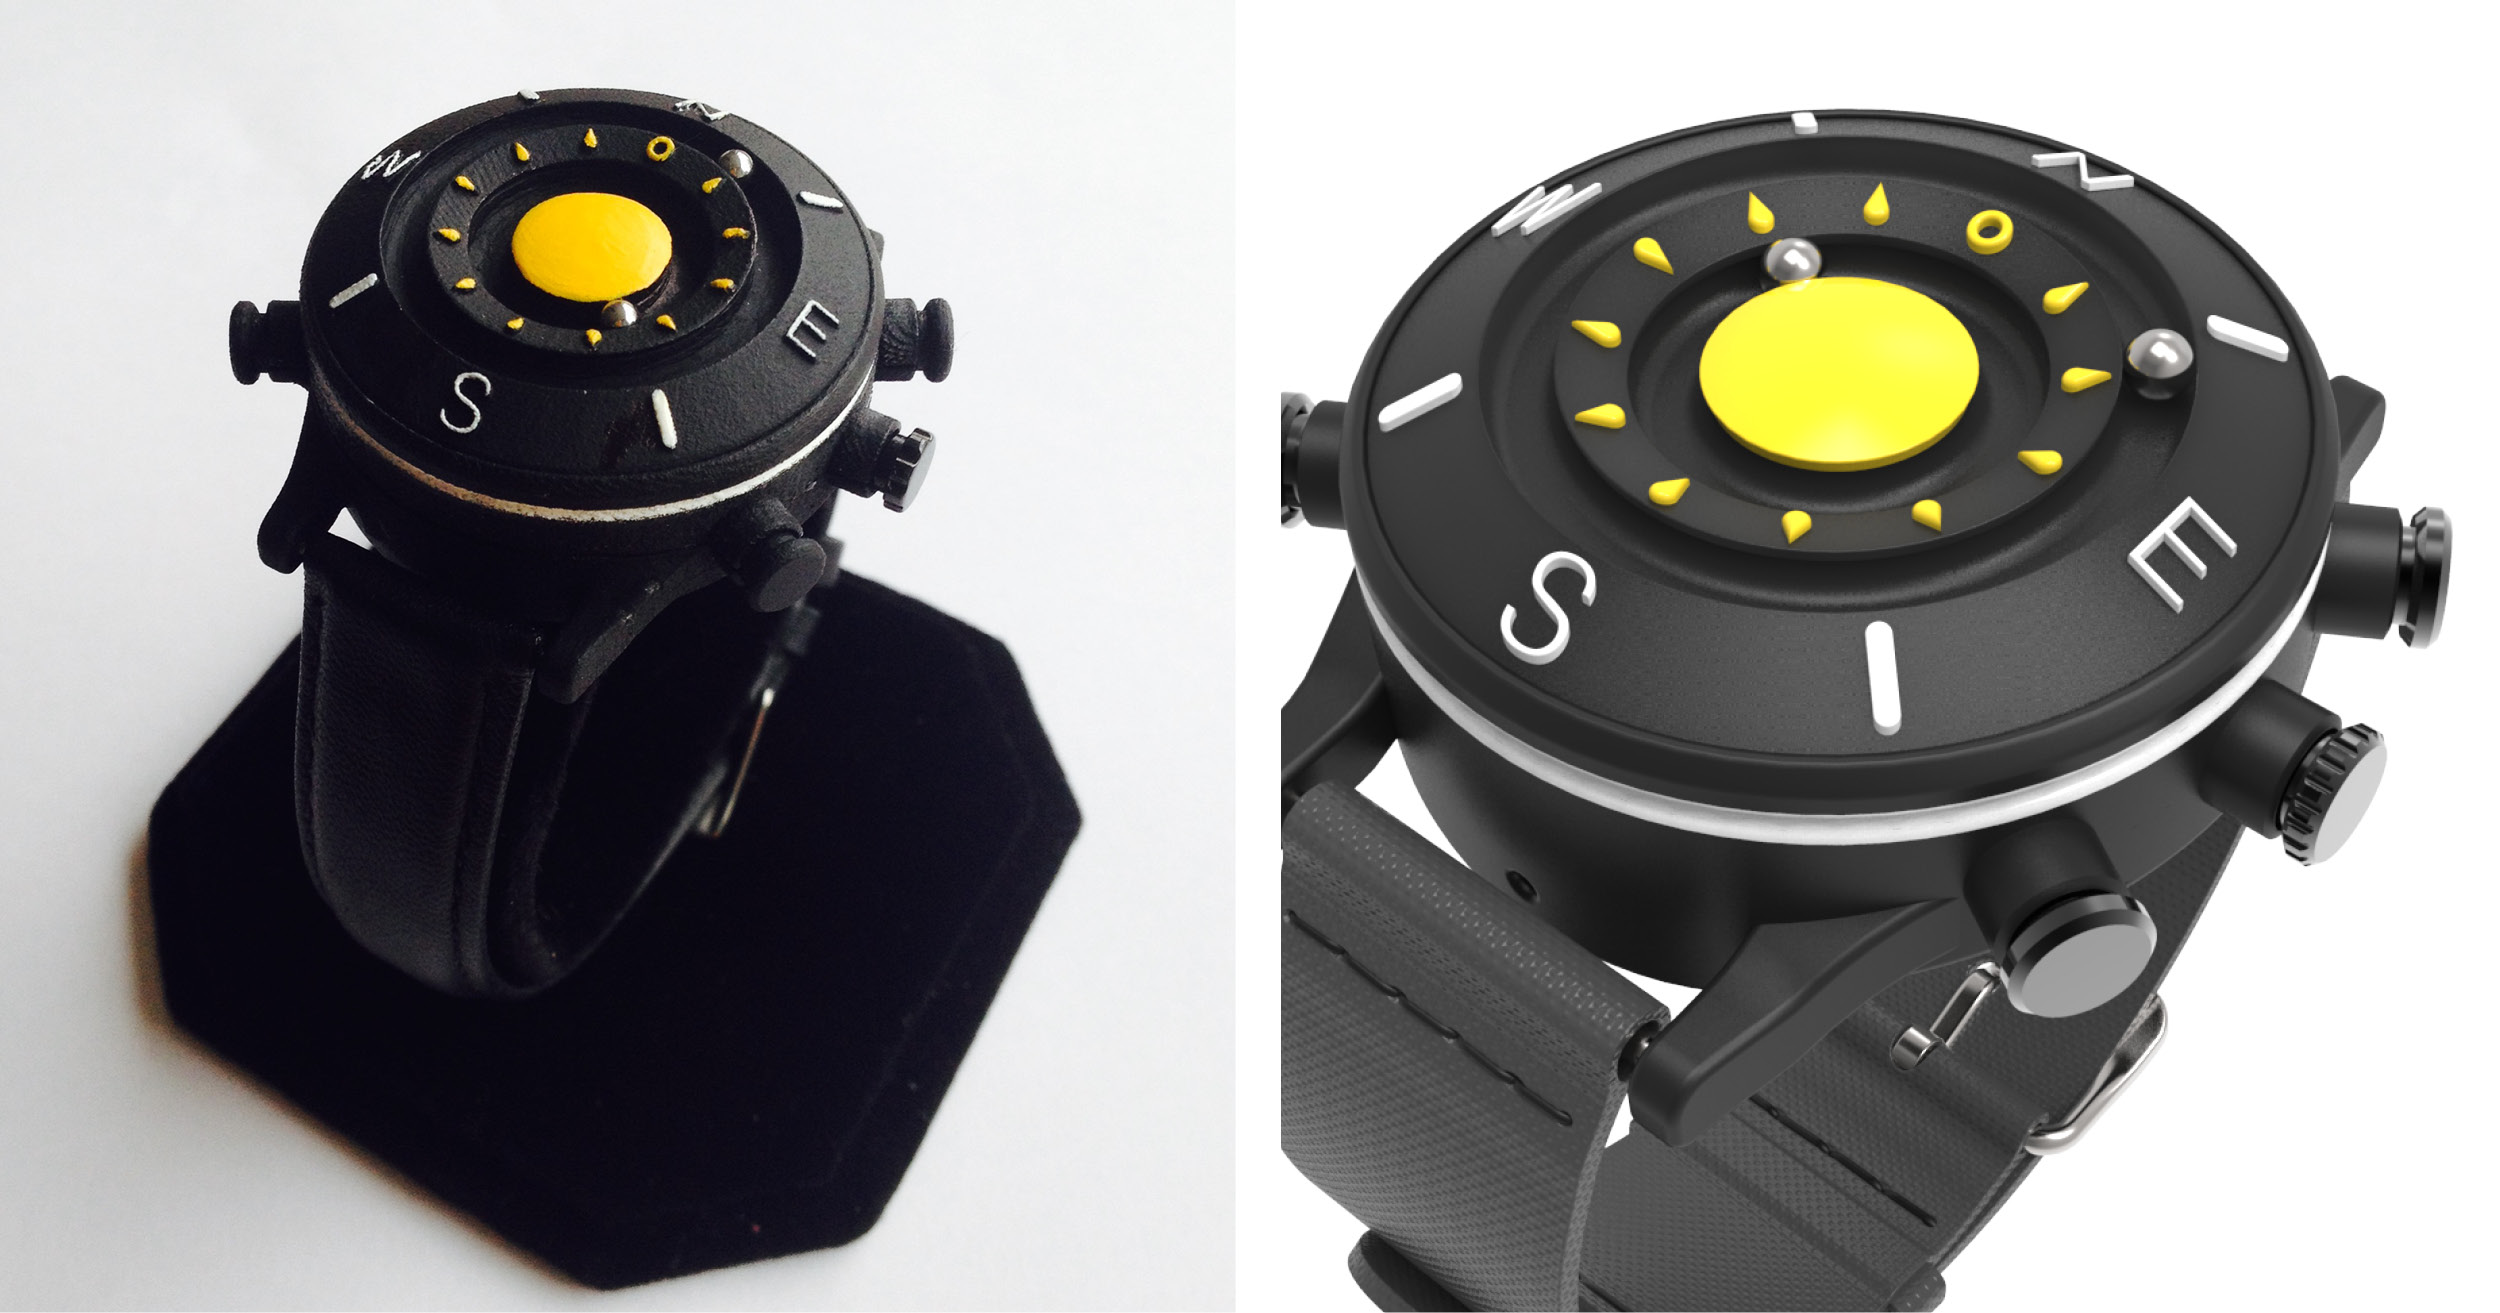
“Orbit is the world’s most inclusive watch. The product communicates time to all sighted, partially sighted and totally blind individuals.”

Tom’s design addresses the challenges navigating the built environment faced by many with visual impairments, especially in new and unfamiliar environments. The watch is designed for people with visual impairments but could prove useful for others, secretive time-check in a meeting anyone?!

“A unique feature of the product is the built in tactile compass, making Orbit the first watch to deliver a compass bearing through the medium of sensory touch.”

8.
HEAL- An intelligent aid to assist healing of fractures

Emily McNamara Email

Facebook_Timeline_images_HEAL

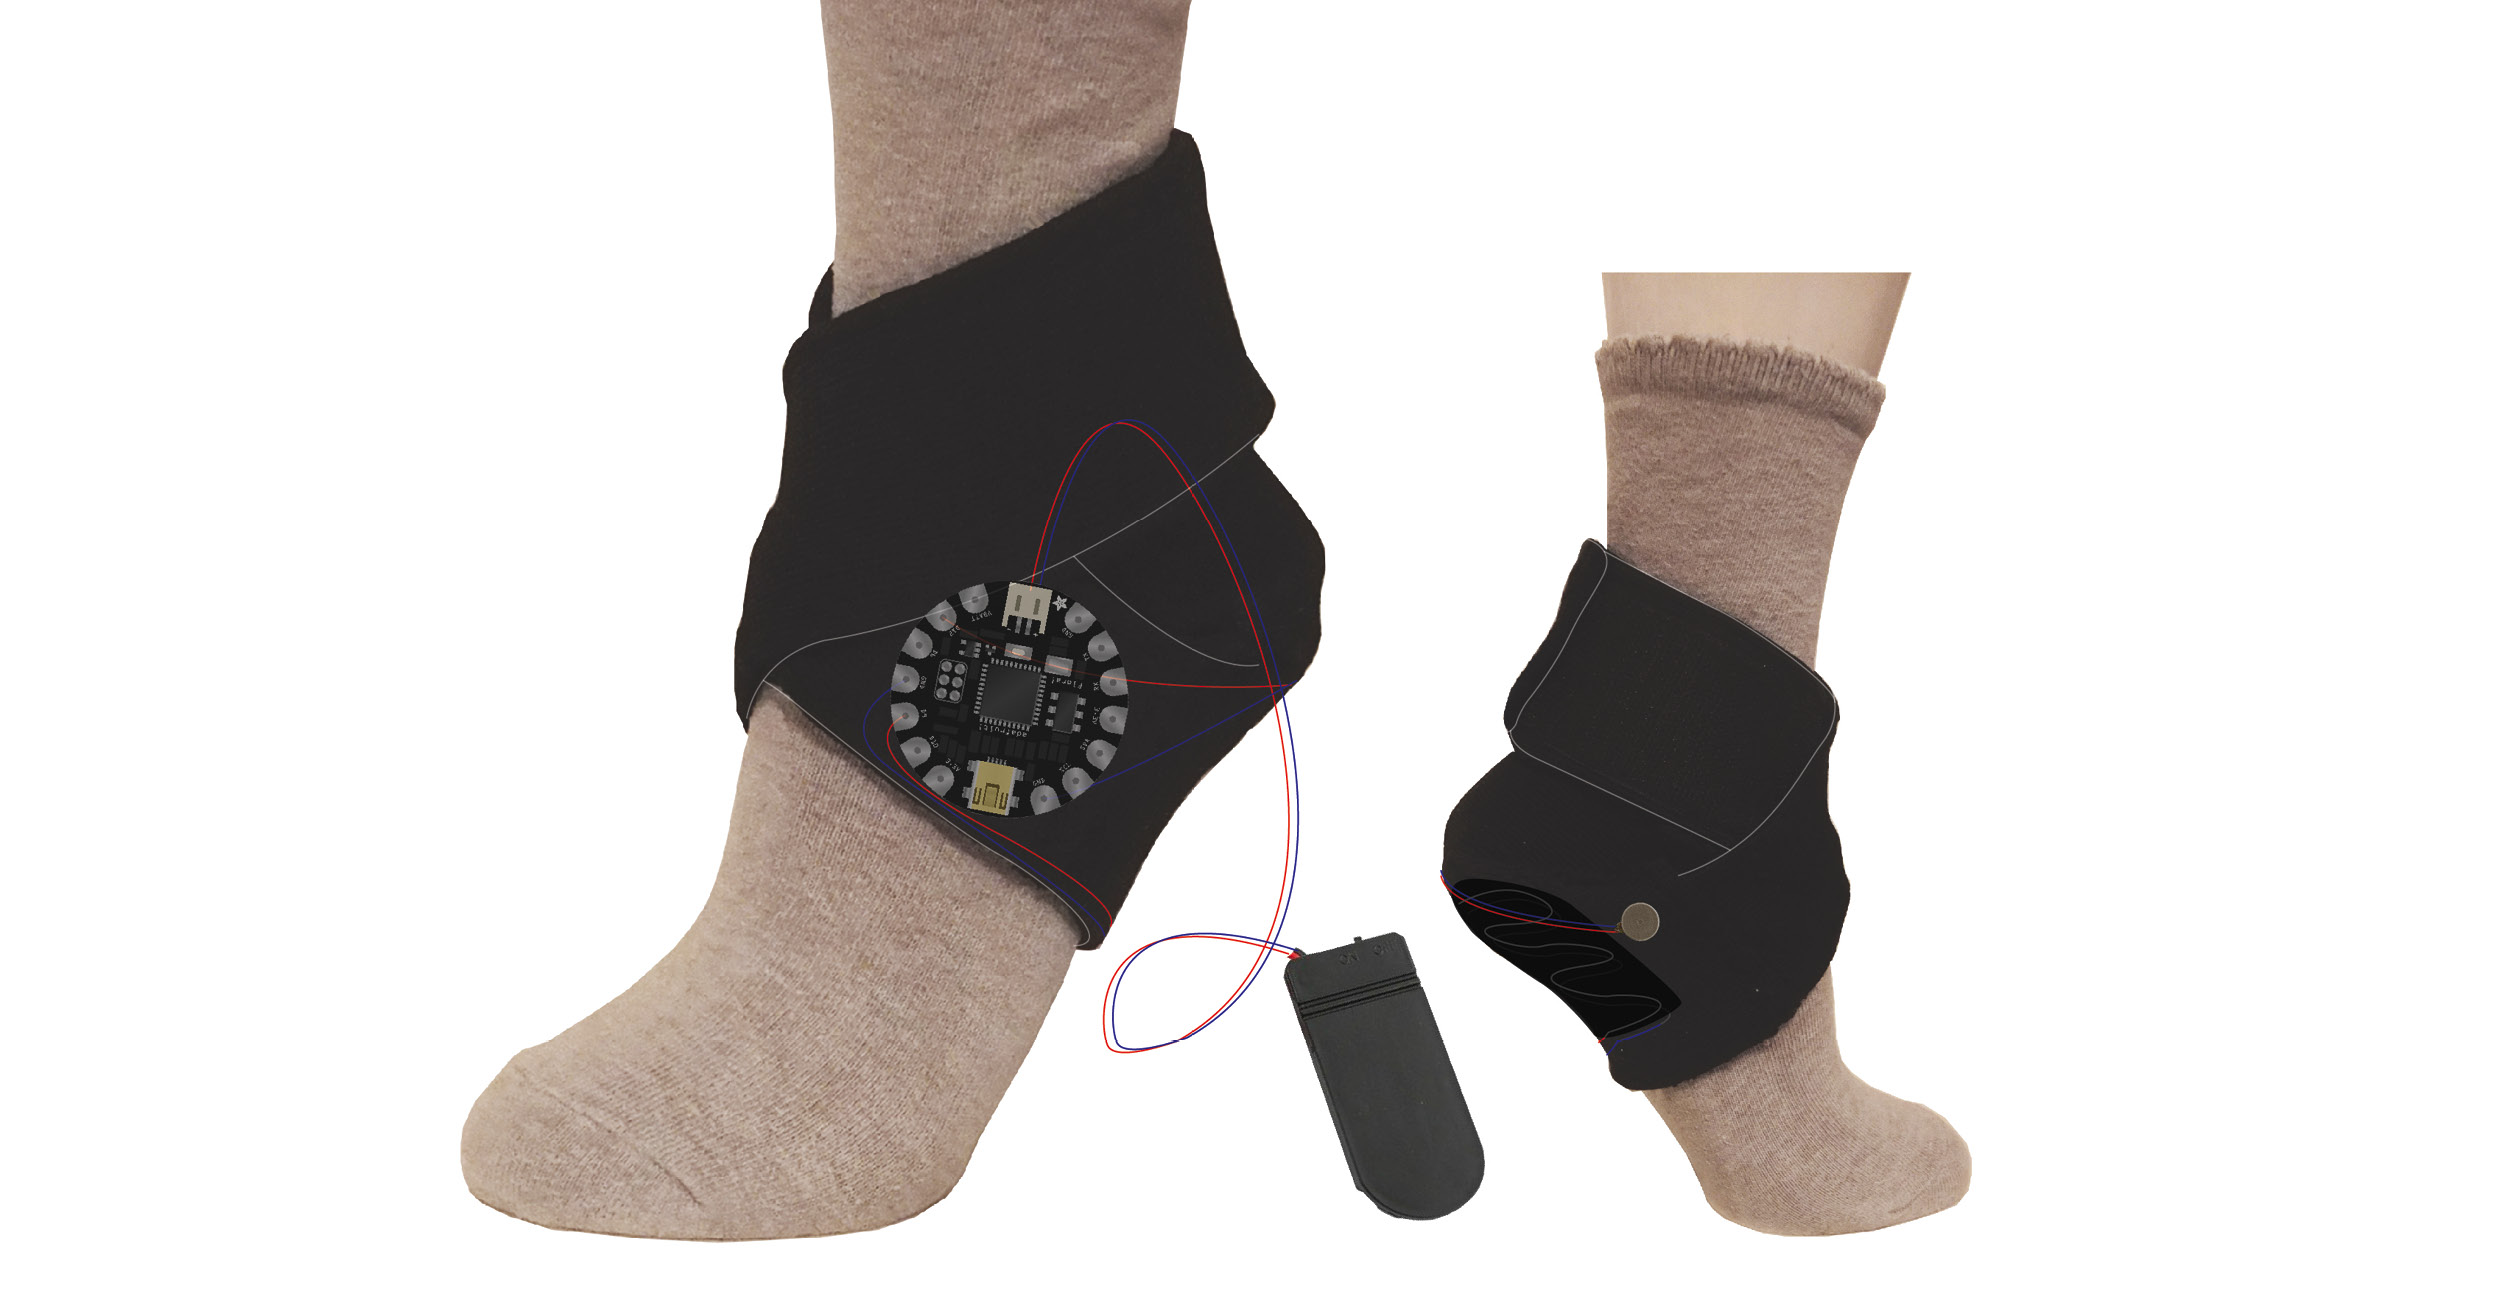
“HEAL uses smart technology to enable swifter healing. Patients wear the device during any time they are mobile. When a patient lowers their foot and puts weight on their injured leg, this weight is detected. This triggers a vibration within the device which acts as a signal to relieve the weight from the foot.”

Emily’s design is intended to create a better relationship between patients and staff, empowering patients to take control of their care and reducing the need for staff to remind patients not to bear weight on an injured leg.

“By trusting the patients to remove and put on the product themselves, staff allow patients to take an active role in their own care; returning to them some of their lost independence.”


We’re inspired by each of these innovative disability designs, if you are too please let us know in the comments!
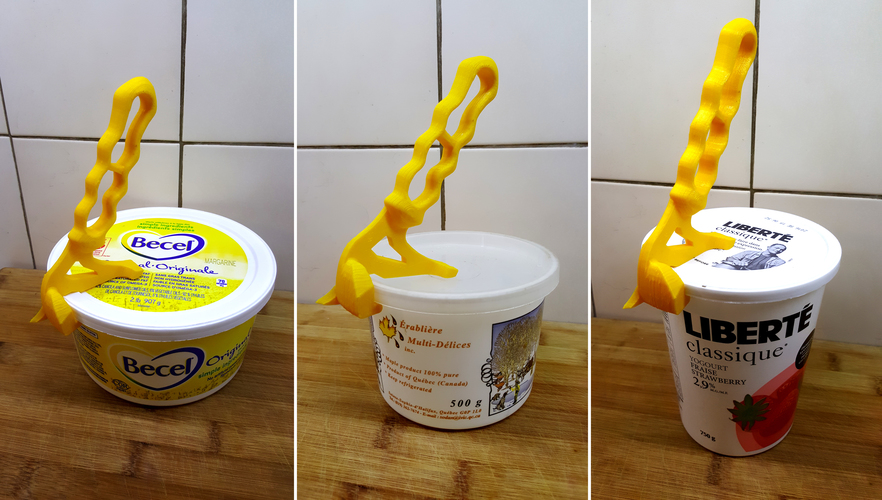
DIY Assistive Spray Bottle

June 3, 2016 in Solution

You will need:

  • Trigger action spray bottle
  • Pair of plastic salad tongs (will make 2 assistive handles)
  • Junior hacksaw
  • Hot glue gun
  • Zip ties
  • Scissors

To make an easy-to-spray handle:

  • Use the hacksaw to cut the looped handle from the salad tongs & sand any sharp edges
  • Apply hot glue to the trigger handle & fix the new loop handle on, wait a few moments for the glue to cool
  • Thread the zip tie through the loop handle and tighten, cut off the excess
  • Enjoy your new easy-to-spray bottle!

Let us know how your DIY handle turns out by leaving a comment or sharing a photo on Twitter! Find us at @Cracked_it_org

uWalk – Design walking aid which also doubles up as a tricycle for children aged 4-8 who have Cerebral Palsy.

November 19, 2015 in Solution

12248495_10153399171468425_1985227518_o

12255644_10153399171493425_470869196_o

The Final Product

We have redesigned a walking aid for children diagnosed with Cerebral Palsy. We have focused on the age range of 4 – 8 years old. The aim of this product is to provide help to the children with the condition in everyday mobility difficulties. We understand that there are currently a wide range of successful mobility devices for this condition however, we found these products not be user friendly or aesthetically pleasing.  For this reason we redesigned the cerebral Palsy walking frame and chair, and incorporated a tricycle to allow the user to cycle. This is a common therapeutic hobby for children with cerebral palsy, so we thought it was an appealing and necessary element to add to the product.

Features and Functions

The final product is displayed in the image to the left. The product is constructed from 5-layer plywood. Using plywood provides many benefits to the products function. Not only is it widely available, but also it is also durable and strong, meaning it can with stand the weight applied from the user. We decided to use specific plywood, which is bonded with a synthetic resin, as this then makes it waterproof.

The product includes adjustable seating to allow the user to change mobility methods, from walking to cycling. The purpose of this is to create a more suitable distance when the user wants to use the pedals. This is adjusted using the holes for the pegs that run down the main frame. The user will remove the pegs provided and align the seat in to the position that best suits the, before reapplying the pegs into the holes to secure into place.

The products steering works through a hinge system constructed using a sheet metal bracket that turns on a vertical axle. This is shown in the image displayed on the left. The joints on the image to the right are attached to the back of the front panel. These are handmade pieces, which are screwed to the surface of the front panel. A 3mm steel bar is then inserted through all the joints. Not only does this hold the two sections together but it also creates a pivot.

The gear system is what makes this product unique. It converts the product from a walking aid to a tricycle, simply by inserting pedals into the driver gear.

The cross sectional view on the image to the left shows how this mechanism functions. The gear on the left is the driver gear. This can be seen from outside the casing through the transparent ABS laser cut window. This is connected to the following gear with a bicycle chain. Both the driver gear and following gear are the same size with the same number of teeth. This means how many rotary motions the driver gear is turned, the following gear will turn the same amount of rotations. The back axle holds two fixed wheels on either side of the gear casing. This if for added stability and balance when the user is walking. The back axle is also fixed to the follower gear to allow the wheels to turn when the driver gear is moved with rotational movements from the pedals. This axle is made using 10mm steel tubing (hollow, wall thickness 3mm).  All wheels from this product are up-cycled children’s bicycle wheels. The front wheel of the product is an up-cycled child’s tricycle wheel. The actual wheel itself is not fixed to the front axle. Only the bearing section is attached. This allows the wheel to rotate without the axle turning. This was useful because the front frame has very little space to attach a rotating axle to. Instead the axle was bolted straight to the back of the frame. The front axle is made from 5mm steel. It was turned and cut on the lathe to get it to the correct thickness and length.

Anthropometrics and Data

Anthropometrics influenced the design majorly when looking at what shapes and sizes to use for the frame and wheels. We had to consider a number of aspects in the design and how they would vary depending on the users sizing. Looking at the highlighted area on the graphs to below, it indicated our target markets (4-8) average weight and height.

Manufacturing processes

Manufacture for the frame is relatively easy. This is one of the main benefits of using plywood, as it is so easy to machine. The main body, front panel and gear box casing are all laser cut from a sheet of five layered Plywood. A laser cutting machine uses less energy to run than most alternative methods, whilst still being efficient to maintain. They are also designed to run without human supervision making it very time effective. If a laser cutting machine is not available, the parts can be cut using a band saw. Both processes would still require a hand finish to the edges for safety precautions. Sheet bending is required to form the bracket that will join the front panel and the main frame together. A brake machine will be needed to accomplish the 90 degree angles needed. This part could be brought in but is cheaper to manufacture if the machine is available.

How the product suits the user

There are many things to consider when designing for a young child with Cerebral Palsy. Every child will have different weak points in their body and we must make sure they have the support needed to overcome said weakness.

The bike is low riding and features removable pedals. By removing the pedals we are making it easier to walk with the bike as a support system, the pedals would only obstruct the movement of the child. Having a lightweight support system with a seat means that when the child gets too tired from walking they can rest and sit. They could even sit while pushing themselves along.

On the pedals we have included a strap to secure the foot to the pedal. By doing this we making it easier for the child to continuously make a cycling motion without worry of trying to keep their foot on the pedals.

Due to it being a tricycle, and having three wheels, there is more stability than if it were just a bike with two wheels. This means that the child does not need to balance the bike; in fact the bike will provide balance for the child. Having this extra balance has mean that we can have pedals that the child straps into as there is no worry of them losing balance and toppling the tricycle.

The handlebars have to be appropriate for both cycling and walking. So we considered if it had to be extendable or not, and after taking anthropometrics into consideration we designed the correct distance for the user meaning there was no need for the extension.

The seat has to have the most support, requiring mainly lower back support. It is cushioned and padded in the required areas for maximum comfort and support. The seat is adjustable so that it can be put in five positions to suit the use, whether this is using the product as a walking aid or as a tricycle.

We have made sure that the tricycle has a very low centre of gravity and is extremely stable, this is highly important as if the child were to lose stability and lean, or become ridged it is important that the bike will not tip over. We want the user and their parents to have complete confidence in the aid.

From our research of existing products we saw that they all seemed very clinical and not very child friendly. To make our product more appealing to a young child we have chosen materials that can be coloured easily, making it available in many colours. We focused on primary colours initially to show how simple colours can make the bike stand out.

We are also hoping that as it is wood we could provide the child with stickers so that they can even personalise their bike, as it is wood the stickers could be easily sanded off and painted over if the child changed their mind on what they wanted on their bike. Our product encourages the child to walk from an earlier age, building muscles, flexibility and confidence. When muscle is built and exercised more often the child is less likely to have stiff muscles, which can be extremely painful.

“Physical therapy empowers the child physically and emotionally, and sets the stage for entering adulthood as an independent individual.” (What are the benefits of physical therapy?)

Redesigned Therapeutic Saddle: NTU DEMAND Brief

November 19, 2015 in Solution

Storyboard             Presentation-Board

Research Report

Hello everyone, we’re team adam and we’d like to introduce you took the result of therapeutic saddle project.

Our product gives disabled children a safer seat on horse back and brings the legs as close as possible to the horse. The warm temperature and the movements of the horse relaxes the rider’s legs and spastic muscles, as well as easing stiff joints.

We focused our product on a young boy called Thomas, who is 11 years old and has spasticity in both his legs. He started hippotherapy half a year ago. And even now after that short time period, his movements are becoming more controlled. After a therapy session he can even walk without his walking frame for a short time.

However. there are some issues that are clear with the therapy sessions, the biggest one being the saddle. The current saddles specifically for hippotherapy are mainly just made for the child to lie on. This is not good for the rider, horse or therapist. If the rider is unbalanced on the back of the horse, he could cause discomfort for the animal, thus the situation becomes much more unsafe, this then results in the therapist not being able to provide thorough sessions due to having to worry about the state of the horse and the rider way more than they should.

Therefore we have managed to design a lightweight, soft, multi-purpose saddle to help provide support for the therapist, and child resulting in a more effective session for the rider. We really wanted to make the whole experience something more for the 3 users involved with this process. A normal day in the life of a disabled child is filled with limitations, as soon as they get onto the horse they become empowered. This feeling is what drives a lot of the kids at the RDA groups and really inspired us to create a fantastic product.

ADAPTIVE SEAT FIXTURE FOR KAYAKING

September 28, 2015 in Solution

This post was originally on www.instructables.com created by user 

Kayak Adaptation

Kayak Adaptation

This is my NEWEST Seat Design that plugs right into a stock Malibu Two!

This design will work perectly on both models of the Ocean Kayak, Inc. Malibu Two – original and XL, and can be modified to fit a wide variety of other models. The requisite is that there are scupper holes near the back of the seat pan area for the seat fixture to rest in.

This seat adaption is designed to provide the upper trunk support that, for instance, an incomplete quad, would need to keep his or her body centered over the kayak, thereby greatly reducing the possibility of a capsize. Paddlers with many levels of physical ability have found great comfort in using this design. You will see it being utilized in many of the photos on my web site.

Step 1: ADAPTIVE KAYAKING SEAT FIXTURE – PARTS LIST

Seat Fixing

Seat Fixing

Seat Fixing Components

Seat Fixing Components


ADAPTIVE SEAT FIXTURE (LATEST DESIGN) – PARTS LIST

3/4″ PVC PIPE PIECES:

A  2 EA     6.0 CM
B  2 EA     5.5 CM
C  2 EA    15.0 CM
D  2 EA    12.0 CM
E  2 EA    16.0 CM
F  2 EA     23.0 CM
G  2 EA     9.0 CM
H  2 EA     9.0 CM
I   2 EA      6.0 CM
J  1 EA    44.0 CM
K  1 EA    40.0 CM

Referring to the first photo attached to this step…
These latest dimensions remove the gap at B and lower the height 1 inch.
H will appear ~3/4 inch longer than shown to compensate for shorter B and E.

PIPE FITTINGS:

4 EA   90 Degree Elbows
6 EA   45 Degree Elbows
6 EA   T Fittings
2 EA   Couplers – Use the long ones if you can find them!


Step 2: ADAPTIVE SEAT FIXTURE – INSTRUCTIONS

Seat Fixing Components

Seat Fixing Components

Seat Fixing

Seat Fixings

INSTRUCTIONS

Cut all the pieces according to the Parts List in Step 1, ensuring the longest measurable length of each piece matches the dimensions given in the list.

Be sure to use a Primer on the joints just before applying the Glue and pushing the pieces together.

Build each of the sections of this design as shown in the second photo attached.

Pipe pieces K, C, and particularly J can be wrapped with a section of Hot Water Line Insulator as shown for J in the second photo.

Piece J is a critical part of the design. It effectively deepens the seat pocket to keep the paddler from slipping forward and out of the pocket.

Step 3: ADAPTIVE SEAT FIXTURE – NOTES

Kayak Adaptation

Kayak Adaptation Assembled

NOTES:

— It’s easiest to make the groups as shown below first, then fit them together.

— J is 4CM longer than K to spread the upper supports.

— J is wrapped with closed-cell foam hot-water-pipe insulation for padding.

— The lengths of E, H, and I are critical to properly position J.

— B, C, and D are joined by 45 degree Elbows.

— H and I are joined by a 45 degree Elbow.

— The fixture is held in place by the seat, and by the paddler’s legs over piece J.

— This design uses 2 fewer fitting pieces than my original design
and can be made with one 10-foot length of 3/4″ Schedule 40 PVC pipe.

— Pieces A can be lengthened for more of a reclining position.

— Pieces F and D can be adjusted equally to accommodate paddler height.

— DO NOT CHANGE the length of pieces E, H, and I, for use on a Malibu Two!

— Padding on C and the paddler’s PFD make for a nice snug fit in the fixture.


Step 4: USING THE ADAPTIVE KAYAKING SEAT FIXTURE

Kayak Adaptation Rear

Kayak Adaptation Rear

The Adaptive Seat Fixture is placed in the center seat postion of the kayak, guiding the rear vertical pieces into the scupper holes at the rear edge of the seat pan.

The Seat Adaption could be used without the addition of the seat-back as shown in the photos (black) below. The paddler’s PFD (assuming it’s a good Paddler’s Jacket) would provide for the padding needed to make use of it, and the paddlers legs would mostly hold the fixture in place.

Still, a much improved setup is created by adding a nice seat-back, such as the Surf-To-Summit model shown in the photos. Use a bungee cord to hold the back of the seat-back firmly into the fixture as shown in the first photo. Then, connect the forward straps of the seat-back to the factory installed eyelets provided for that purpose and cinch them up. When properly fitted, the seat-back and seat fixture will feel very tightly bound to the kayak with very little play in any direction.

Cup Holder for Crutches

September 28, 2015 in Solution

This post was originally on www.instructables.com created by user 

Crutch Cup Holder

Crutch Cup Holder

Those who have broken an ankle know how frustrating it is that you can’t carry anything in your hands while crutching. Just because you’re off your foot for six weeks doesn’t mean you can’t drink with the best of them! Use this mod to be more independent and wow your friends.

Step 1: Materials And Tools

Materials and Tools

Materials and Tools

All of these materials I found at an ACE hardware in Salt Lake City.

Materials:
– a six-inch steel plate
– corner brackets x 2
– 1/4″ hex bolts (1″ x 4, 1/2″ x 2)
– washers and nuts
– 1/2″ section of 3″ dia PVC pipe
– 1/2″ section of 4″ dia PVC pipe

Tools:
– vice grips
– pliers (needle nose and regular)
– tin snips
– duct tape (duh)
– adjustable width pliers
– lighter
– nail
– rasp, file or screw driver (for widening holes)


Step 2: Widen Bolt Holes

Widen Crutch Holes

Widen Crutch Holes

Because you didn’t buy the right hardware, open a beer and get to it. Using force and misusing any skinny tool you can get your hands on, widen the holes in your cheap aluminum hospital crutches. Try not to slice open your hand. You’ve been there before and it’s not pretty.

Step 3: Attach Corner Brackets And Cross Bracket

Attach Corner Brackets

Attach Corner Brackets

By some stroke of luck, the bolt holes align so put the pieces together (for once in your life).


Step 4: Sterilize Needle / Drill Holes In PVC Rings

Sterilize Needle Drill Holes In PVC Rings 01

Sterilize Needle Drill Holes In PVC Rings

Sterilize Needle Drill Holes In PVC Rings

Sterilize Needle Drill Holes In PVC Rings

For lack of appropriate tools, you decide to melt holes into the sides of your cup holder and support rings. These are for the bolts that act as an axis. Use a lighter to heat a nail and force it through the rings. Make sure they are exactly opposed or the cup won’t swivel right.

Step 5: Bolt Everything Together

Bolt components together

Bolt components together

Tighten nuts around support ring (black) and to the cross plate. This is the one point of contact the crutch has with your coffee, so make sure it’s strong. Make sure there is enough play for the inner ring to spin freely.

Step 6: Enjoy Your Crutches Cup Holder

Enjoy your cup holder close up

Enjoy your cup holder close up

Enjoy your cup holder

Enjoy your cup holder

Make a duct tape net for the inner ring so it can hold your beer, or leave as is for tapered vessels like coffee cups and mugs.
Ta-da! Now go get sloshed.

Skip to toolbar