You are browsing the archive for Cracked It | 2017 January.

FleXiseat floor seat

January 27, 2017 in Solution

F41EGNZHVXPR9YQ.MEDIUM

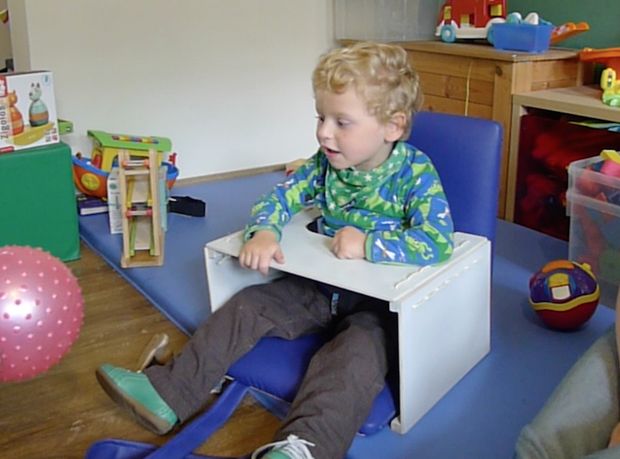
This DIY product is designed for a three years old boy that was born with cerebral palsy. He has an inadequate trunk control so he can not sit independently, he would fall on his side.

At home he sits in a custom tailor made seatshell. But this is too big to take everywhere along. His parents like to go out by bike to friends or family, but there is always the problem that they can’t let hem sit on a normal chair to play with other children.

The question of the parents was to make a chair which is foldable, easy to carry, giving enough support so that the boy can sit straight and play with his friends, but still compact to put in the bicycle bag.

A shot movie, following on the intractable, will explain the advantages of the seat.

Step 1: Materials needed

Materials needed

Step 2: Saw the wooden pieces

Saw the wooden pieces
IMG_4978.jpeg
538cc736d535cf13ee000043.jpg
538cc7dad535cff93f00008f.jpg

Buy two different pieces of wood, a 3mm multiplex and a 15mm multiplex. Than saw two 395x300x4mm pieces and two 330x400x15mm pieces.
Drill holes in the 15 mm pieces; drill in a line 35mm of the border. The distance between two holes is 3 mm.Buy two different pieces of wood, a 3mm multiplex and a 15mm multiplex. Than saw two 395x300x4mm pieces and two 330x400x15mm pieces.

Drill holes in the 15 mm pieces; drill in a line 35mm of the border. The distance between two holes is 3 mm.

There have to be cut out rectangulars as well, this can also be done with a drill, by drilling holes close to each other.

Step 3: Attach a lath

Attach a lath

First there has to be sawed a lath 330x20X15, we attached this to one of the wooden pieces of 15 thickness, with an air staple gun but this can also be done manually.

Step 4: Connecting the wooden pieces

Connecting the wooden pieces

Weave the rope between the thickest wooden pieces by using the saddle stitch. This technique will ensure the proper firmness.

Step 5: Attach Foam

Attach Foam
L1060690.JPG

Attach the foam using an air staple gun or an manual stapler.

Step 6: Skai

Skai
L1060696.JPG

Attach the leather, by using an air staple gun or manually with a stapler.

Step 7: Handles

Handles

Stich handles and attach them onto the back of the wooden pieces.

Step 8: The back

The back
L1060744.JPG

Attach the thinner wooden pieces with some nails onto the backs of the seat, to hide the ugly staples.

Step 9: Add the straps

Add the straps
233293030.jpeg
538f15ef9d29c9a8fa00000d.jpg
L1060727.JPG

First make a finishing stitch around the openings for the buckles.

We used a support pants, because the child can not sit straight by himself. That little pants ensures support around the waist and helps him to sit up straight.

To attach the support pants, insert the buckles in the openings and secure them at the back with the clamping buckles.

Step 10: Make a fitting table

Make a fitting table
L1060733.JPG
L1060734.JPG

The table ensures extra stability for the child. The child can put his arms on the table and lean on it, this will make him sit up more straight by himself. He has to do some effort by himself with is better than a belt around his chest, because exercise is good for the child, otherwise he will get lazy which is bad for his muscles.

The table is made in the same style as the seat.

We used the multiplex. Dimensions:

– table leaf: 390x310x5mm
cutout for the belly: 260x150mm

– table legs: 310x210x5mm

To make the cutout for the belly, measure the waist of the child and see for yourself what the best measurement is for your child.

To put the table together, we used the same technique as the seat so we drill holes in the planks 20 mm of the borders. The holes are drilled 30mm from each other. For the plank, also drilling 20mm from the border and 30mm from each other.

For stability, we attached 4 laths again on the side planks, on each side plank, two laths. This laths are 18x15x310mm.

The planks are fixed to each other with rope again, we will do this in the same way as we did with the seat.

The loop that can be seen on the pictures has been stitched out of the skai and attached with staples onto the middle plank. This loop can be attached onto the support pants. This ensures that the table can’t be pushed away by the child while he is playing. This gives extra safety.

Step 11: Final result and team

Final result and team

You can find more information on our blog

Project made by:Carolle Geldof, Emily Quartier, Jaana Caes and Sahin Vanneste

Via Instructables

Be sure to click the ‘This Solution Helped Me’ button at the top of this page if you give this a try!

Hack your nail clippers with Sugru

January 20, 2017 in Solution

Fixperts Benchmark Residency – Nail Clippers grip Sugru hack from Fixperts on Vimeo.

With thanks to@MayaAlvarado1

Be sure to click the ‘This Solution Helped Me’ button if you give this a try!

by Zoe

Pram and wheel chair hood

January 4, 2017 in Solution

IMG_5960

the old hood on the left was paid by a charity from the company who provided us with my sons wheel chair who is 5 years old. I never used it because it would sit in his face and it was so small it didn’t protect him at all from the Sun. The new hood which I found after someone else posted about it on a special needs group on Facebook, is from mothercare, cost me £15 in the half price sale and as you can see the difference in the pictures is just amazing. My son is big for his age and though he can’t get the full use out of the hood it does the job so much better. It covers his face and shields him from wind, rain and the sun. If he was smaller the hood unzips and would go right down to the foot plates with a clear plastic cover so he can be seen and see out. By far the best thing I’ve found in 5 years and I know many other families will benefit too.

Skip to toolbar